
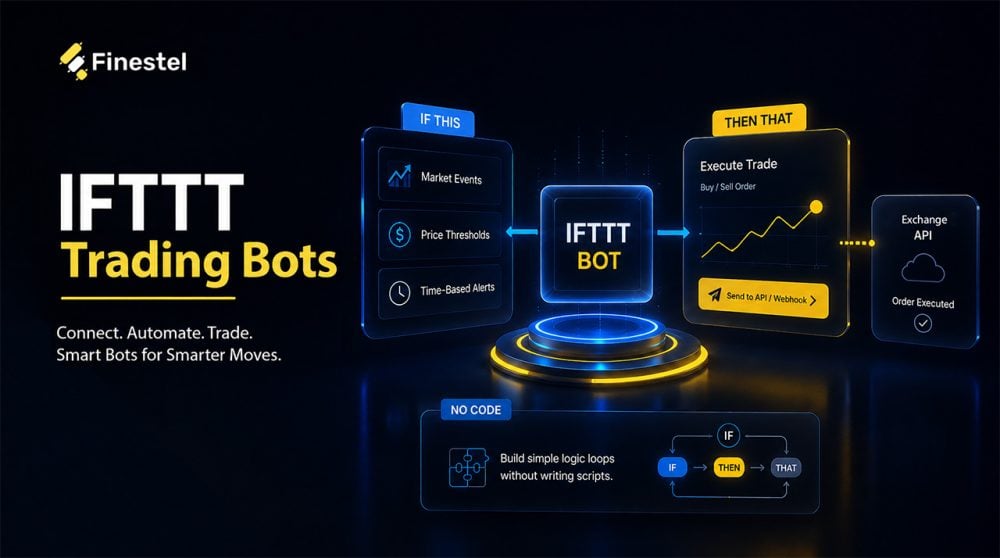

IFTTT, short for “If This Then That,” is a platform that lets you use ready-made applets to automate different tasks or build your own customized interfaces without coding. One of the more interesting use cases of IFTTT is generating and receiving crypto trading signals and connecting them to a trading bot to automate trades.
IFTTT can generate and forward crypto trading signals, but it is not a trading bot or execution engine. To automate actual trades, you need to connect those signals to a tool such as Finestel signal bot, which handles order execution and risk settings on your exchange. Also, based on my experience, it works best for simple, low-frequency automations rather than complex or latency-sensitive strategies.
What Is IFTTT and How Does It Work?
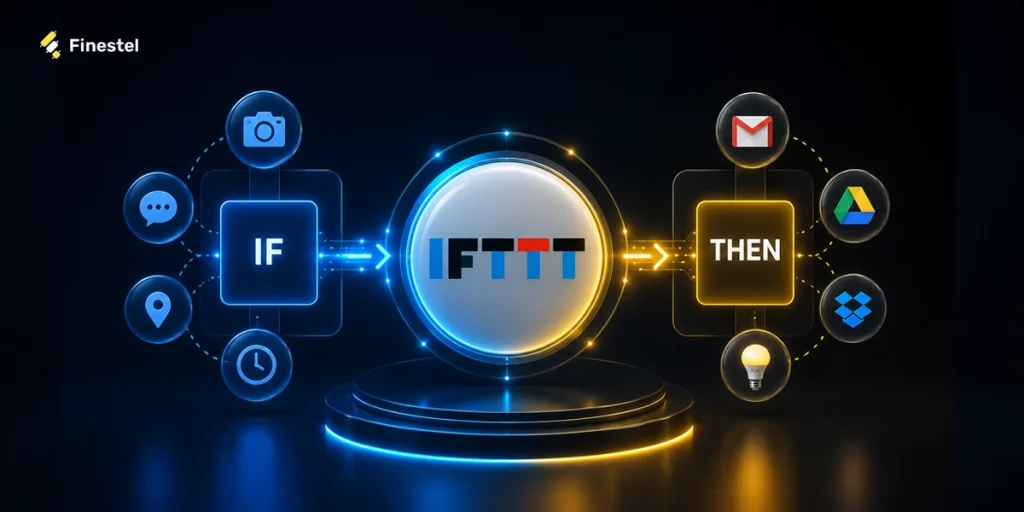
IFTTT stands for “If This Then That.” The basic logic of the platform is that the interfaces built inside it produce a predefined result when one or more conditions are met. Each automated interface on the platform is called an Applet. An Applet connects two or more services and, in its simplest form, consists of a Trigger and an Action. The Trigger is the event that activates the Applet, while the Action is what happens after it is activated.
You can use hundreds of thousands of ready-made IFTTT Applets available across different services to automate your everyday tasks. For example, you can connect an Applet to your smart washing machine and turn it on at a specific time of day.You can also log your call history in Google Calendar.
But that is not all. You can also build your own Applets without coding and use them to automate crypto trades. For example, you can create an Applet that sends a trading signal to a bot whenever a news website publishes an article about increased inflows into Bitcoin ETFs.
Can IFTTT Be Used for Crypto Trading Automation?
First of all, it is worth mentioning that the phrase “IFTTT trading bots,” which you may come across online, is not technically accurate. This is because IFTTT acts as a signal source rather than a trade automation or execution engine. In other words, IFTTT can help you collect Triggers from different sources and convert them into a format that can be sent to an execution service.
The actual trade and details such as position sizing and risk management must be handled by a specialized system such as a crypto trading bot. For example, Finestel’s Signal Bot is designed to receive signals from sources such as IFTTT and turn them into trades on connected exchanges.
One way IFTTT can generate these signals is through its RSS service. If you trade based on breaking news, for example, you can use the Binance RSS feed as a Trigger. Whenever a new announcement is published, IFTTT can send a Webhook request to a crypto signal bot. However, this setup cannot determine whether the news is positive or negative on its own, so fully automated execution would still require additional filters, conditions, or manual review. 
Turning Price, Time, News, and Data Events Into Signals
As I mentioned earlier, IFTTT offers different services across various categories, and you can use their ready-made Applets to generate signals. For example, the Finance service includes Triggers such as “Price rises above or falls below a specific level.
The Date & Time service also lets you schedule a Trigger for a specific time, such as every day at a certain hour. To track news events or other specific data, you can use services such as RSS Feed or Twitter so that your Applet is activated whenever a new article or post is published.
Plans and Usage Limitations
The free plan lets you create two Applets. To build more, you need to subscribe to the Pro or Pro+ plan. Before purchasing, you can use these plans free for seven days. IFTTT Pro costs $4.99 per month and lets you create up to 20 Applets. When billed annually, it costs $35.88, saving you 40%. The Pro+ plan costs $14.99 per month and includes unlimited Applets, or $107.88 per year when billed annually, saving you $72 compared with monthly billing.
In terms of functional limitations, the Finance Triggers that can be used for price-based signals are limited to Pro plans. Their practical use in crypto is also mostly restricted to Triggers based on the price moving above or below a certain level. Webhook Actions are not available on the free plan either. For more information, check out the IFTTT website at ifttt.com
Execute IFTTT signals with Finestel Signal Bot
Finestel signal bot is designed to receive signals directly through Webhooks. Each Signal Bot has its own Webhook URL, and any system capable of sending a POST request can activate it. This means we can create a Webhook Action directly on IFTTT and paste the Finestel bot’s Webhook URL into it. Once the Applet is triggered, Finestel receives the signal and executes the trade. Here is how to connect Finestel’s Signal Bot to IFTTT:
Step 1: Add Your Exchange Account to Finestel
First, log in to your Finestel account. Go to the “My Exchanges” section, click “Add Account,” choose your exchange, and enter your API keys. Finestel only requires Read and Trade permissions. 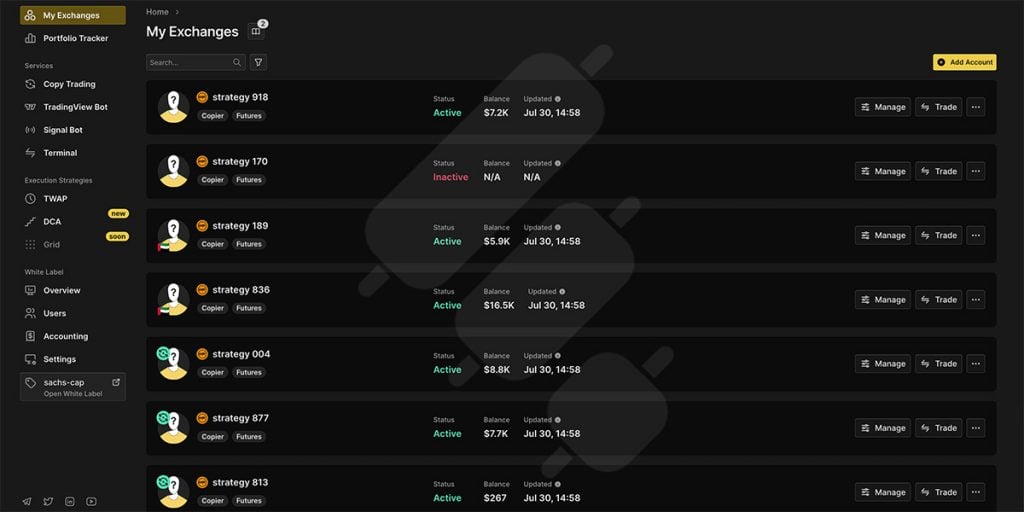
Step 2: Create a New Signal Bot and Generate the Webhook URL and JSON Payload
From the left-hand menu in the Finestel dashboard, select “Signal Bot” and click “Create Bot.” Details such as the Webhook and JSON Payload are displayed on this page. After creating the bot, define parameters such as Name, Exchange Type, Order Type, TP, and SL.
In the “Signal Terminal” section, you also need to set parameters such as Exchange, Symbol Pair, and Order Size. Once these parameters are configured, the JSON Payload is generated automatically. Copy the Webhook URL and make sure the bot is active. 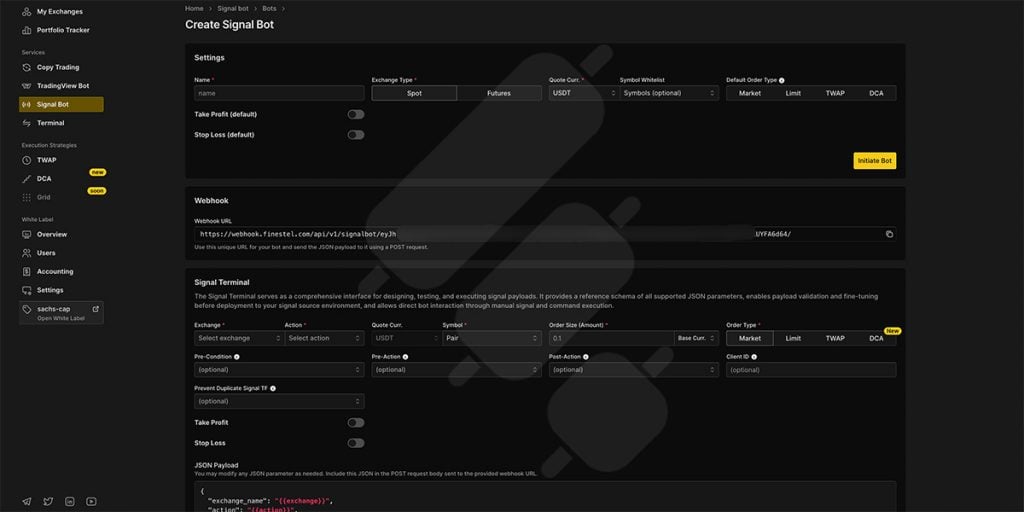
Step 3: Sign Up on IFTTT and Create a New Applet
Now log in to your IFTTT account and create a new Applet. There are two ways to build one:
- Chat: Describe what you would like to build, and the platform does the rest.
- Classic: Go directly to the If-Then buttons and add your rules manually.
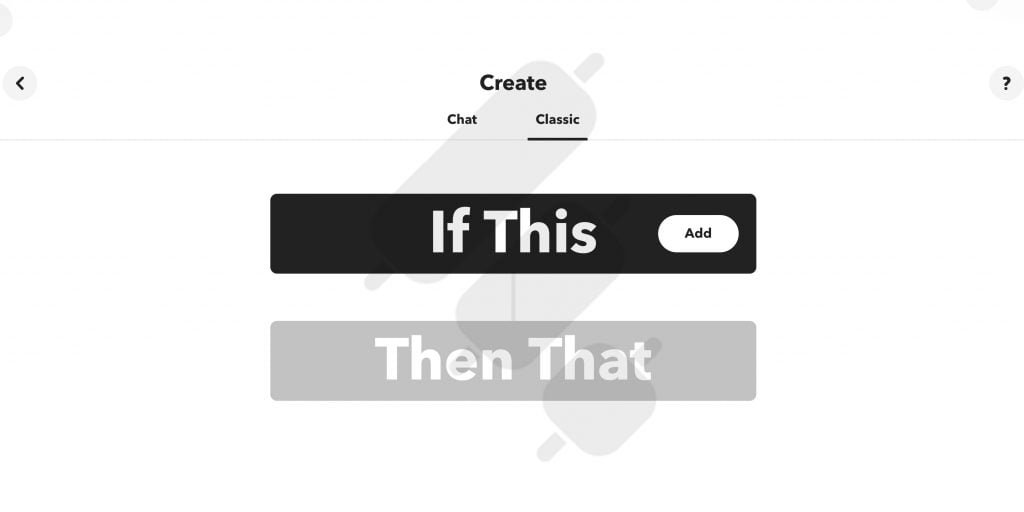
Step 4: Choose the “If This” Trigger or Chat With It
I am going to use the Classic method to activate the Trigger. In the “If This” section, click the “Add” button. Now choose a service that will act as the signal Trigger.
I am using the RSS Feed service and the “New feed item matches” Trigger to receive a news item and convert it into a signal. Enter your target keyword and the RSS URL, then click “Create Trigger.” 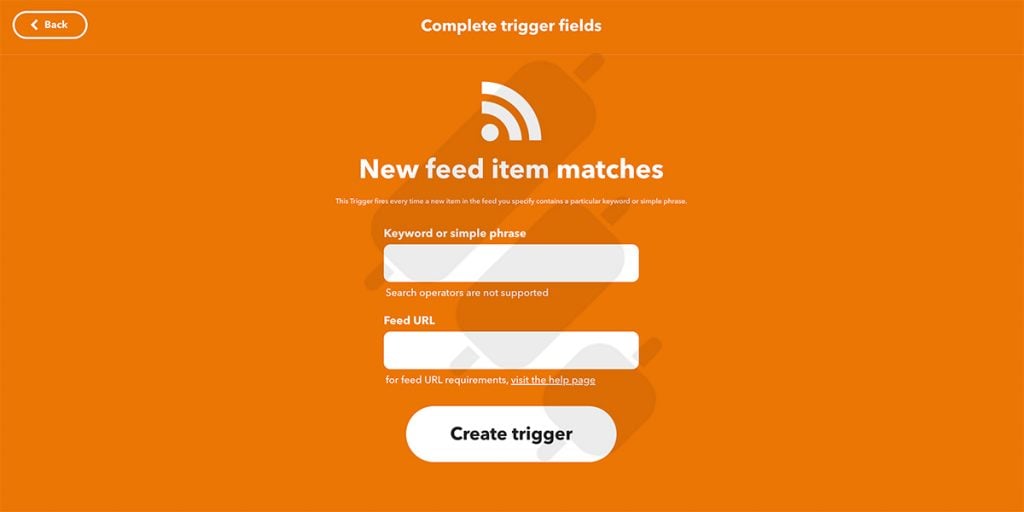
Step 5: Select Webhooks as the “Then That” Action
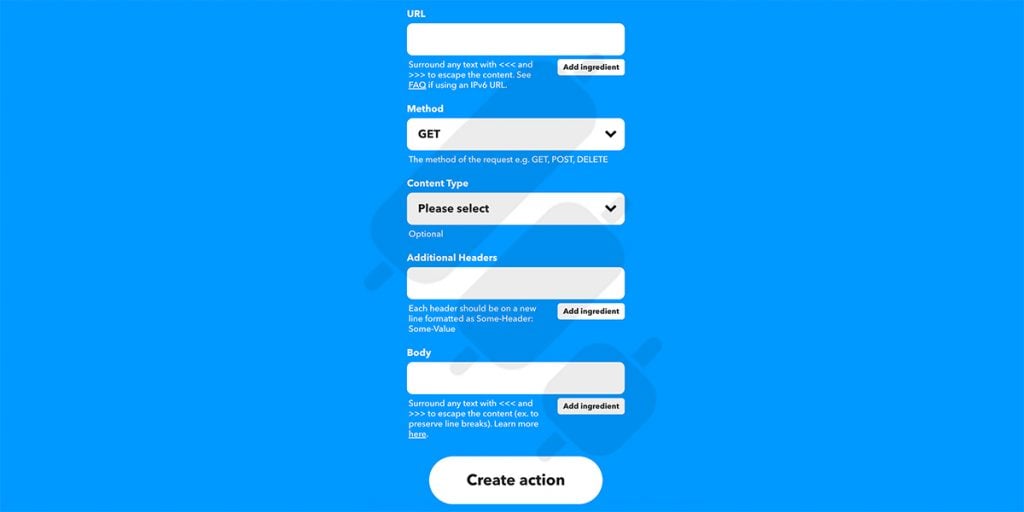
Now click “Add” in the “Then That” section, search for Webhooks, and select it. Next, choose the “Make a web request” Action. Then complete the following fields:
- Paste the Webhook URL you copied from Finestel signal bot into the URL field.
- Change Method to POST.
- Select application/json as the Content Type.
- The Additional Headers field is used to send HTTP headers with the request. Headers provide extra information about the request to the server. In Finestel, authentication is handled through the Secret Key inside the URL or Payload rather than through a Header, so you can leave this field empty.
- In the Body field, paste the JSON Payload generated for your Finestel signal Bot.
Step 6: Activate and Monitor the Automation
That is it. Your Finestel signal bot is now connected to IFTTT and can receive the signals generated by your Applet.
TradingView to Finestel: Direct Connection or Through IFTTT?
One point worth mentioning is that if you use Finestel and your signal source is TradingView, you do not need IFTTT. Finestel has a dedicated TradingView bot that lets you connect TradingView alerts directly to the bot and use it for crypto trading automation.
Using IFTTT between TradingView and Finestel may only make sense when you want to perform another task before sending the signal, such as logging data, sending a notification, or connecting the alert to other services. 
IFTTT vs. Alternatives: Zapier, Make, and n8n
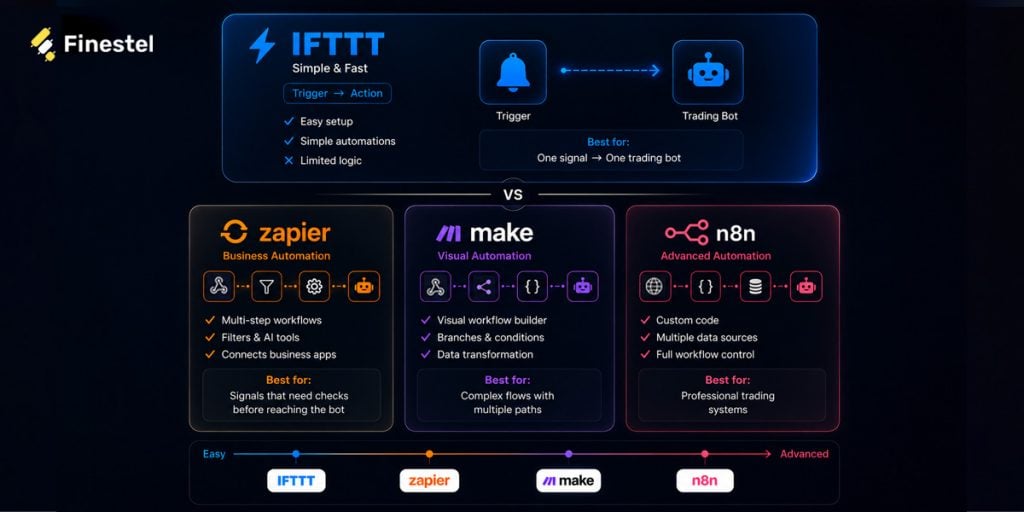
IFTTT, Zapier, Make, and n8n are automation tools that can receive a crypto trading signal from a specific source and send it to a bot to automate trades. In the table below, I have summarized the main differences between these four tools, followed by a more detailed comparison.
| Tool | Useful for | Main Feature | Plans and Pricing |
| IFTTT | Simple automation | User-friendly interface with ready-made Applets; no coding required | Free plan: 2 Applets Pro plan: 20 Applets for $4.99 per month or $35.88 per year
Pro+ Plan: Unlimited Applets for $14.99 per month or $107.88 per year |
| Zapier | Multi-step processes | Automating complex business workflows and connecting thousands of apps; no coding required | Free plan: 100 two-step tasks per month
Paid plans vary and start at $19.99 per month |
| Make | Complex and advanced workflows | Advanced visual interface, complex logic, and strong debugging tools, although it takes time to learn; no coding required | Free plan: 1,000 operations per month
Paid plans with unlimited active scenarios start at $9 per month |
| n8n | High flexibility, self-hosting, and cloud hosting | Supports multiple Triggers and custom logic but requires technical skills | Free when self-hosted
Paid cloud plans start at €20 per month |
IFTTT vs. Zapier
Both Zapier and IFTTT are automation tools that let you define conditions and automate a process. One of the most important differences between them is their target audience. IFTTT is mainly designed for personal use and simple automations, while Zapier is more focused on team workflows and connecting business applications.
From my experience building the IFTTT workflow in this guide, its main strength is how quickly you can connect one Trigger to one Action. However, I also found that the setup becomes limiting as soon as you need to inspect a signal, reformat its data, or add another condition before sending it to a trading bot. This is where Zapier feels more suitable.
In practical terms, I would choose IFTTT when I only need a simple “when this happens, send this request” workflow. I would consider Zapier when the signal needs to pass through several checks or business tools before reaching the bot.
On Zapier’s free plan, you can run up to 100 tasks per month using two-step workflows and access its AI features. Paid plans, including Professional, Team, and Enterprise, vary by the number of users, access to multi-step workflows, and other features, with prices starting at $19.99 per month.
For knowing how to automate trades with Zapier read our article.
IFTTT vs. Make
Make, formerly known as Integromat, is a free IFTTT alternative that also offers paid plans with additional features. Its main advantage is its visual workflow builder, which lets you create multi-step scenarios, add several conditions, branch a workflow into different paths, transform data between steps, and define error-handling rules.
For a crypto trading workflow, Make can receive a signal from your analysis system, check whether it matches conditions such as the asset, strategy, or trade direction, reformat the payload, and route it to different trading bots based on the result. It can also log the signal, send a notification, or stop the workflow when a condition is not met. This makes Make more suitable than IFTTT for complex automations and more visual than Zapier when you need to see and manage each step of the workflow.
From a usability perspective, IFTTT was easier for me to understand and configure at the beginning. Make, however, would be my preference for a workflow that contains several branches because its visual layout makes the logic easier to inspect and troubleshoot. The trade-off is that it takes more time to learn.
Make’s free plan includes 1,000 operations. Paid plans, including Core, Pro, Teams, and Enterprise, offer different features and start at $9 per month.
By reading our MAKE automation platform guide, you can see how to automate crypto trading with this platform.
IFTTT vs. n8n
n8n trading bot is another tool that has recently become popular in the automation space. Unlike IFTTT, it lets you combine multiple signal sources, create complex branching paths, chain several conditions together, and add custom JavaScript or Python code when built-in nodes are not enough.
The biggest difference I noticed when comparing n8n with IFTTT is the level of control. IFTTT hides most of the technical complexity, which makes it easier to use but also limits what you can change. n8n exposes far more of the workflow logic, including individual data fields, conditional paths, error handling, and custom transformations.
For example, an n8n trading workflow could receive signals from TradingView, an RSS feed, and an on-chain data source, compare their values, calculate a score, reject conflicting signals, reformat the final payload, and send a POST request to a trading bot only when all required conditions are met. It can also add retry logic, error handling, data storage, and separate execution paths for different assets or strategies.
For my use case in this guide, n8n would be unnecessary because the workflow only needs to send a signal from one source to one trading bot; IFTTT is easier for that purpose. However, I would choose n8n over IFTTT for a custom trading system that depends on several data sources or requires logic that cannot be built with standard Trigger-and-Action blocks.
You can use n8n for free, but you need to configure it on your own computer or private server. If you do not have your own server, n8n Cloud is available and runs on n8n’s infrastructure. Depending on the plan, pricing starts at €20 per month.
The image below shows the differences among IFTTT alternatives at a glance:
Risk Management When Using IFTTT for Trading Automation
When using IFTTT to receive signals and connect them to a crypto trading bot, you should keep several points in mind:
- Keep Webhook URLs and credentials private. These provide access to the trading bot you have created. If your trading bot’s Webhook is exposed, someone may be able to send fake buy or sell requests.
- Never include exchange API secrets in an IFTTT Payload, and restrict exchange API permissions. For example:
- Enable only the required permission, such as Spot Trading.
- Keep withdrawal access disabled.
- When possible, restrict access to a specific IP address.
- Block Duplicate Signals. Fortunately, Finestel signal bot includes measures designed to handle this. To prevent duplicate orders from being executed unintentionally, the bot uses two built-in mechanisms:
- Repeated signals for the same symbol and order type are ignored within a specified time window, ranging from one second to one hour.
- If each signal includes a unique Client ID, receiving the same ID again causes the signal to be rejected. The bot also rejects signals older than the permitted Max Lag window.
- Test Automations With Minimum Position Sizes. To reduce risk and test your signals, start with a small portion of your capital.
Final Thoughts
IFTTT is a simple tool that lets you automate workflows and connect them to a trading bot without coding. Its logic is based on “If This Then That”: you define a Trigger, generate a signal, and send it to a trading bot such as Finestel signal bot. The important point is that IFTTT is not a trade execution engine. It is not designed for complex strategies, position-size calculations, or direct order management.
FAQs
Do I Need Coding Skills to Connect IFTTT to Finestel?
No coding knowledge is required. You only need to create an Applet and connect it to a trading bot.
What Happens if an IFTTT Webhook Request Fails?
If the Webhook request fails, the signal may not reach the trading bot. You should review the Applet activity log, check the Webhook URL and Payload, and confirm that the receiving bot is active.
What Type of Crypto Signals Can IFTTT Send?
IFTTT can send signals based on supported Triggers such as RSS updates, scheduled times, social media posts, or selected market-data events. The available signal types depend on the services connected to the Applet.
Can I Pause an IFTTT Trading Automation Without Deleting It?
Yes. You can disable the Applet temporarily and reactivate it later without rebuilding the entire workflow.
Is IFTTT Fast Enough for Automated Trading?
It depends on the Trigger and your IFTTT plan. Polling Applets check for new events about once per hour on the Free plan and every five minutes on Pro and Pro+. In addition, sending signals through IFTTT Webhooks requires a paid plan.




Leave a Reply