


If you search “make automation platform official” on the Internet, it leads to Make.com, home of the MAKE (formerly Integromat) automation platform. Its visual workflow builder connects apps and services to automate tasks. For crypto traders, it can retrieve indicator data, apply trading conditions, and forward signals to a trading bot.
In this review, I explore MAKE’s features, pricing, and integrations, then build a workflow connecting TAAPI.IO to Finestel’s Signal Bot, with filters and stored state to limit repeated signals.
My verdict: MAKE’s visual tools make workflows easier to follow, but setup still requires care. The HTTP module worked when the pre-built integration failed, although authentication, data mapping, and signal handling took extra troubleshooting.
What is MAKE and How Does it Work?
MAKE (formerly Integromat) is a visual automation platform that lets you connect modules to build automated workflows called “Scenarios”. Each module handles a specific task, passing its output to the next step.
For example, you can connect Google Sheets to Telegram so that every time a new row is added to a spreadsheet, Make automatically sends a Telegram message with the details. One module detects the new row, and the next uses its data to create and send the message.
For crypto trading automation, a Scenario can receive signals, filter them based on predefined conditions, and forward them to another service for execution. To do this, you can choose from thousands of ready-made apps or use Make’s no-code toolkit to connect to apps that are not yet in its library.
What Makes the MAKE Platform Stand Out For Crypto Trading?
MAKE.com, which is its official address, combines visual workflow design with detailed control over how data moves between services. For signal automation in Cryptocurrency trading, several capabilities are particularly useful:
- Visual branching and filtering: Routers split a Scenario into different paths, each with its own conditions. You can route signals to different bots based on their source, trading pair, or strategy, while maintaining separate paths for logging and notifications.
- Flexible signal formatting: Field mapping and JSON handling let you reshape incoming data before forwarding it. This helps turn signals from different sources into the payload format required by a signal bot.
- Module-level execution visibility: Scenario history lets you inspect the data processed by individual modules. This makes it easier to trace an unexpected value or investigate a failed request along the signal’s path.
- Connections beyond built-in integrations: MAKE’s HTTP module can send requests to external APIs and webhook endpoints. This provides a way to connect with Finestel’s Signal Bot without relying on a dedicated MAKE integration.
- Custom code within visual workflows: For logic that needs more flexibility, MAKE Code supports JavaScript and Python directly inside a Scenario. Available on paid plans, it lets you combine visual modules with custom signal processing.
- AI Agents within visual workflows: MAKE lets you build AI agents that interpret messages and documents, use uploaded knowledge files, and choose from connected modules or Scenarios to complete tasks. You can test agents through a chat interface and inspect their tool calls and execution steps. For example, an agent could read a customer inquiry, look up relevant information, and route the request to the appropriate team.
MAKE’s Pricing and Subscription Plans
Make’s Free plan is a good starting point for exploring its visual workflow builder and creating your first automation. The Free plan has no time limit and includes:
- 1,000 credits/month
- No-code visual workflow builder
- 3000+ apps
- Routers & filters
- Customer support
- 15-minute minimum interval between runs
If you need more features, MAKE offers Core, Pro, Teams, and Enterprise plans. The table below compares these plans’ pricing for 10,000 credits per month:
| Plan | Monthly Price | Monthly price, billed annually | Features |
| Core | $10.59 | $9 | Everything in Free, plus: – Unlimited active scenarios- More control with scheduled scenarios, down to the minute – Increased data transfer limits – Access to the MAKE API |
| Pro | $18.82 | $16 | Everything in Core, plus: – Priority scenario execution – Custom variables – Full-text execution log search |
| Teams | $34.12 | $29 | Everything in Pro, plus: – Teams and team roles – Create and share scenario templates |
| Enterprise | Contact Sales | Contact Sales | Everything in Teams, plus: – Custom functions support – Enterprise app integrations – 24/7 Enterprise support – Access to Value Engineering team – Overage protection – Advanced security features |
If 10,000 credits/mon are not enough, you can determine how many credits per month you want in each plan by dragging the slider to the right. This also changes each plan’s pricing. For a comprehensive comparison between the plans, check MAKE automation platform’s official pricing page.
MAKE’s Pre-Built Apps for Crypto Trading and Signal Automation
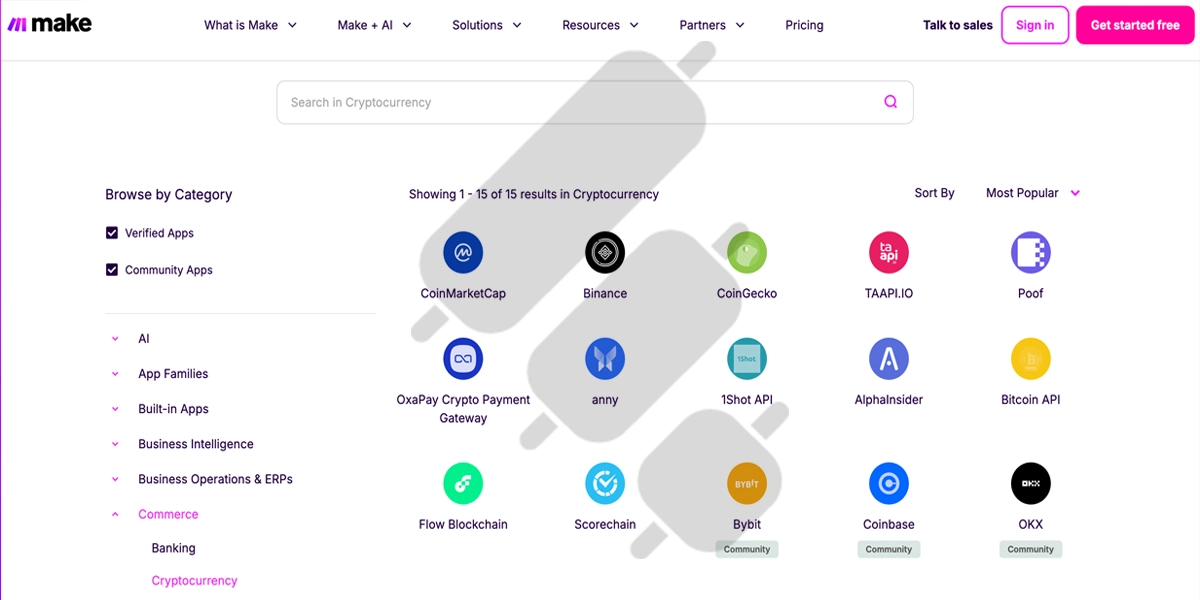
MAKE offers over 3,000 pre-built apps across different categories to help automate workflows. Its Cryptocurrency category includes market data services such as CoinMarketCap and CoinGecko, technical analysis tools such as TAAPI.IO, and exchange integrations such as Binance.
The directory shown below lists 15 apps, including community integrations for Bybit, Coinbase, and OKX.
How to Automate Crypto Trading With MAKE and Finestel’s Bot
You can build a scenario in MAKE manually or describe your idea to Maia, its AI assistant, to help you build it. Your scenario can include the pre-built apps introduced in the previous section.
Once configured, MAKE can receive signals or data from custom sources, such as your own application, an external API, TradingView, Telegram, or a webhook. It processes this input according to your rules and forwards the resulting signals to a trading bot such as Finestel’s Signal Bot. The bot then validates each signal and submits orders to the connected accounts you’ve assigned, applying each account’s size and risk settings.
If your signals already come from TradingView, you can send them directly to Finestel’s TradingView Bot through webhook alerts without using MAKE. However, MAKE can serve as an intermediate step if you need additional processing, for example, checking an external data source before forwarding a signal, restricting signals to specific trading hours, or logging alerts in Google Sheets and sending Telegram notifications.

1. Create an Account on TAAPI.IO
For this tutorial, I am going to use TAAPI.IO. It lets you retrieve technical indicator values and build a Scenario that checks whether they meet your predefined trading conditions. When those conditions are met, MAKE’s HTTP module sends a POST request containing your signal’s JSON payload to the webhook URL provided by Finestel’s Signal Bot. For a complete list, check taapi.io/indicators.
Go to taapi.io and create an account. You can start for free with a 7-day Pro trial. After creating an account, you will be directed to your dashboard, which displays your API key, your plan’s usage limits, and sample code for making your first request.
My example shown below requests the RSI Indicator for BTC/USDT on Binance using one-hour candles. The sample response illustrates the indicator value returned by the API; it is not the asset’s price or a trading instruction.
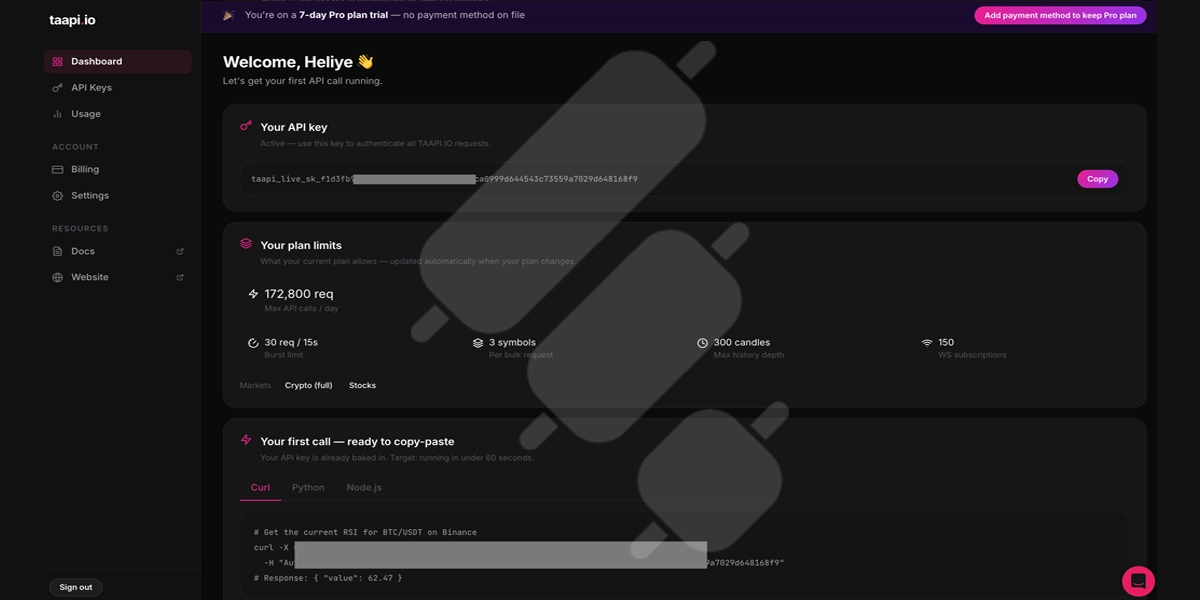
It is worth mentioning that you do not need to change these settings in the TAAPI.IO dashboard. For this tutorial, you will configure them directly in MAKE: either through the fields available in the TAAPI.IO module or through the request URL and query parameters in an HTTP module. Your API key stays the same when you change these settings.
However, keep in mind that the selected market, symbol, timeframe, and indicator must be supported by TAAPI.IO and available under your plan. Also, the exchange selected here supplies the indicator’s market data; the exchange account used to execute trades is configured separately in Finestel.
2. Create a TAAPI.io Scenario in MAKE: Why I Used MAKE’s HTTP Module
For this tutorial, I first tested TAAPI.IO’s app and its pre-built Get Indicator (Single) module in MAKE, but the requests returned a 401 authentication error. I could not confirm the exact cause.
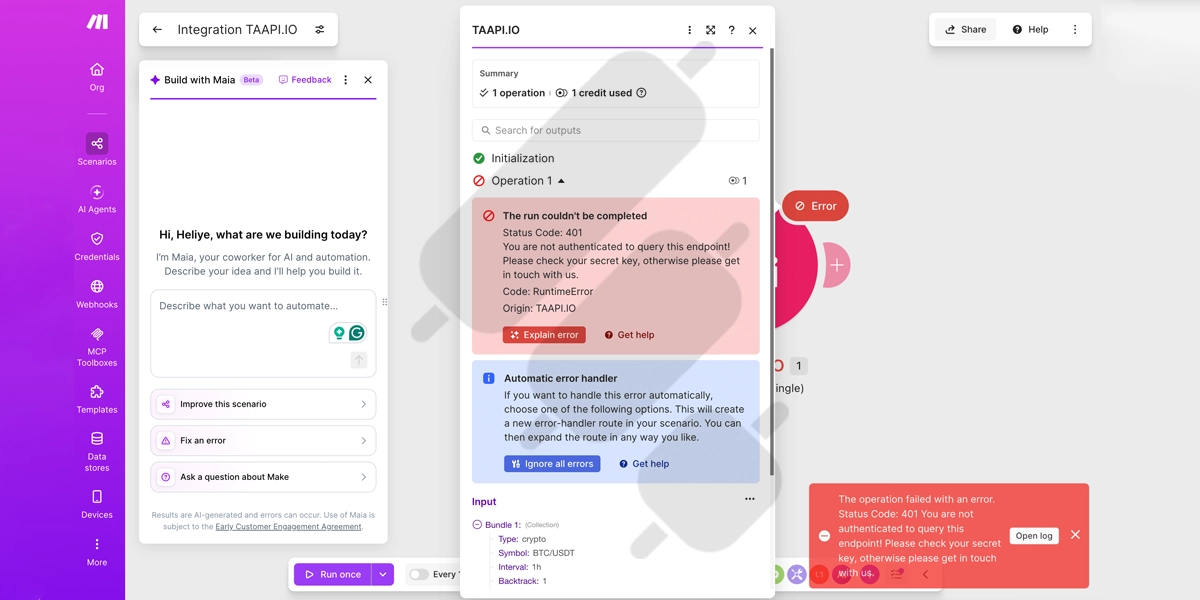
I also contacted TAAPI.IO’s support chatbot and tried the troubleshooting steps suggested by its AI agent, but the error persisted. The chatbot then escalated our query to the human support team and displayed a typical response time of 12 hours.
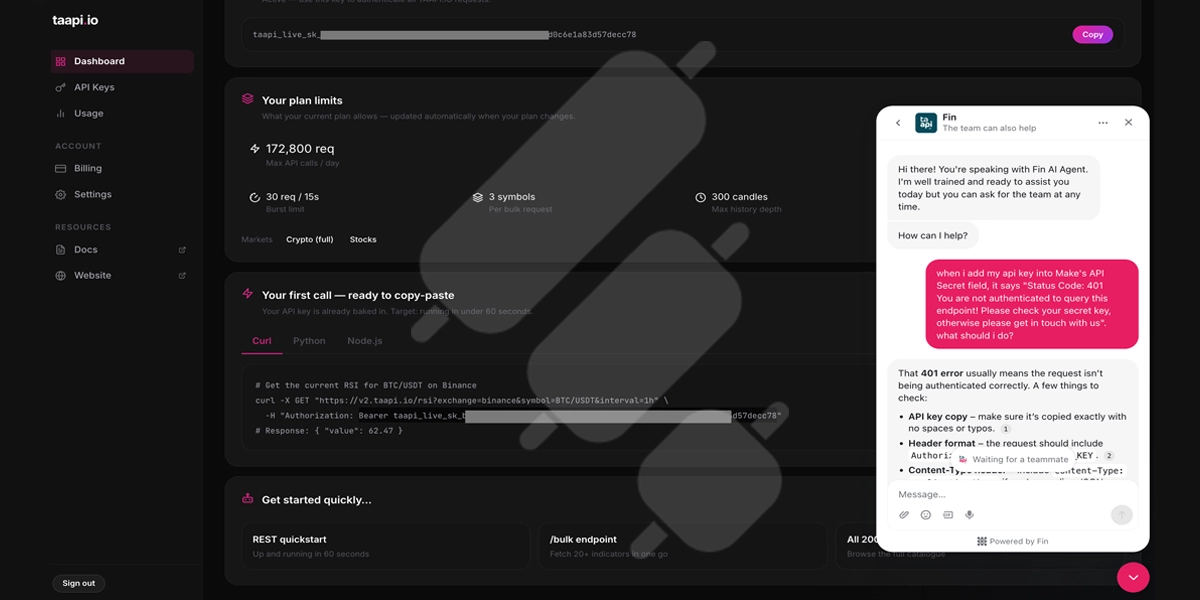
Rather than wait for a response, I continued testing with MAKE’s HTTP module, configuring a direct request to TAAPI.IO’s v2 API using Bearer authentication. This request succeeded with a 200 status code and returned an RSI value of approximately 42.85.
The steps below follow this tested HTTP setup, which also lets us specify the exchange, trading pair, and timeframe directly. While the pre-built module did not work in my test, this does not mean it will fail for every user.
3. Create an HTTP Request
Now that you have your TAAPI.io API key, go to MAKE and create an account. After that, you will be directed to your dashboard. Click on “Scenarios” in the left sidebar and then click “Create scenario”.

Here, click on the + icon in the middle of the page, search for “HTTP”, and choose “Make a request”.
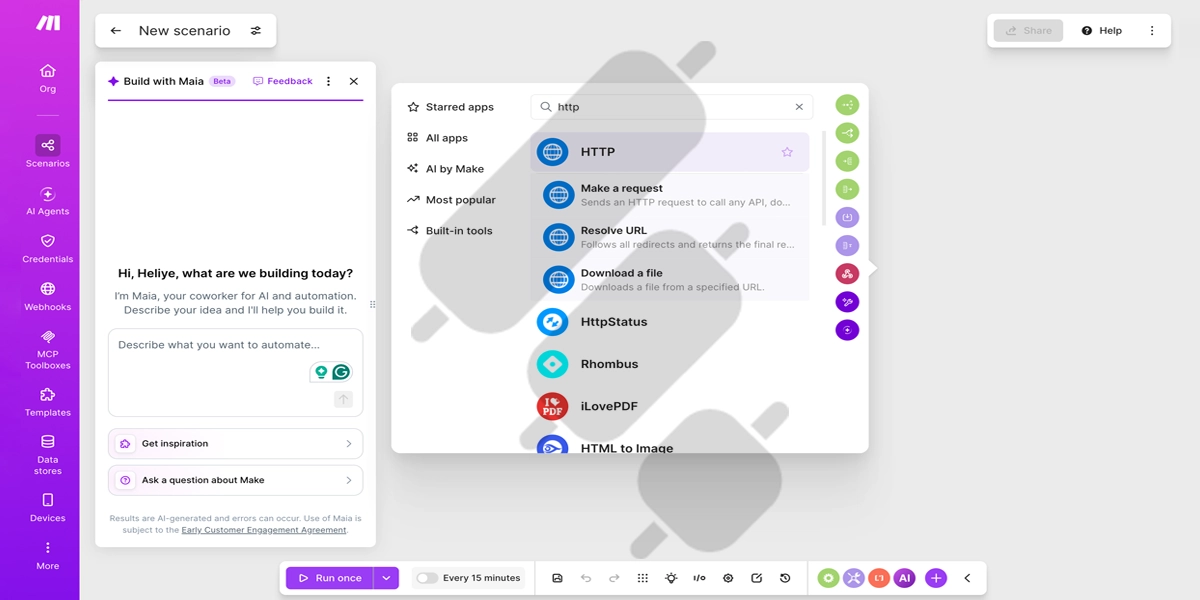
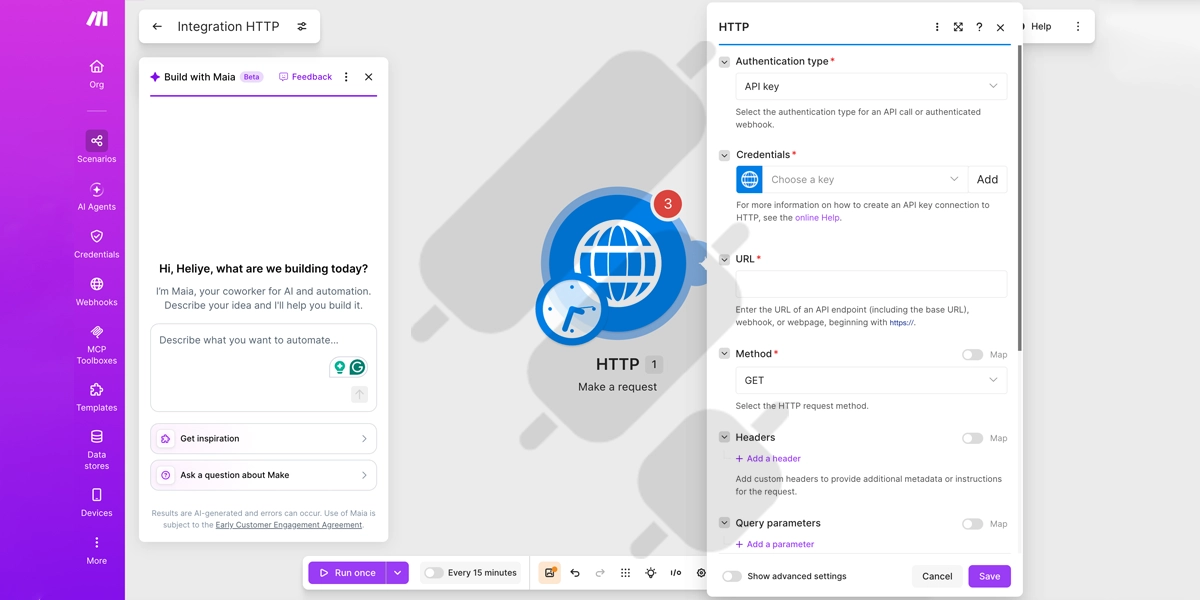
Now a pop-up window will open. Configure the following settings:
- Authentication Type: “API Key”. Then the “Credentials” field will appear.
- URL: I want to use RSI as an indicator. So I would enter “https://v2.taapi.io/indicator/rsi”.
- Method: “GET”.
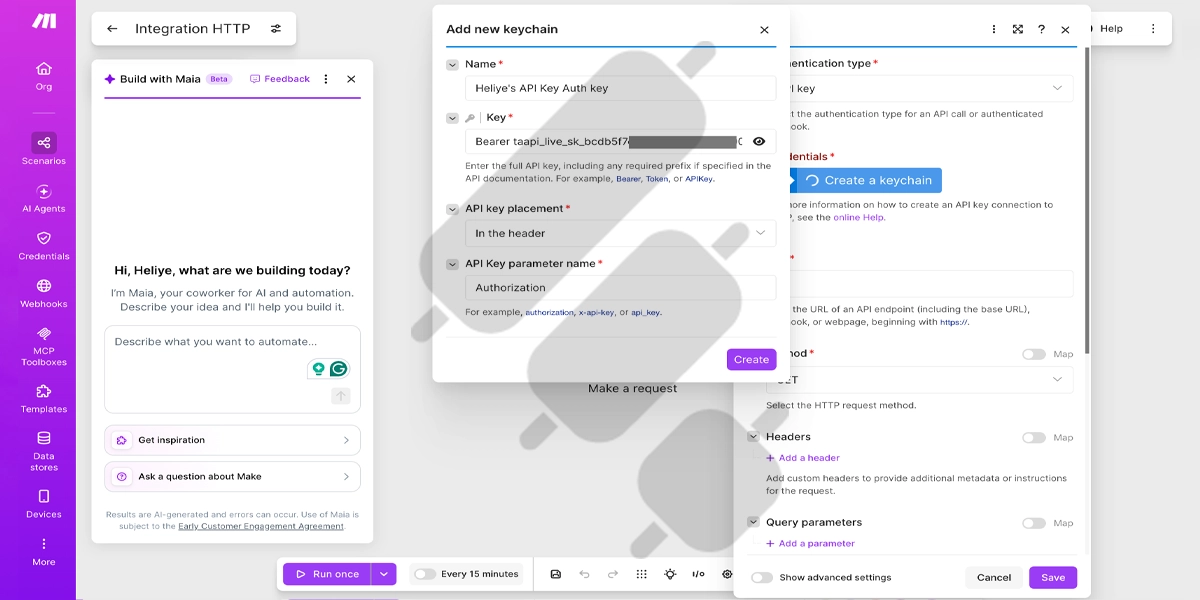
Click on “Add” next to “Credentials” and enter these:
- Name: Choose a name for your keychain.
- Key: Paste your TAAPI.io API Key in this format: “Bearer YOUR_API_KEY”.
- API key placement: “In the header”.
- API key parameter name: “Authorization”.
Next, in “Query parameters”, click “Add a parameter” and configure these parameters, for example, in a separate field:
- exchange: binance
- symbol: BTC/USDT
- timeframe: 1h
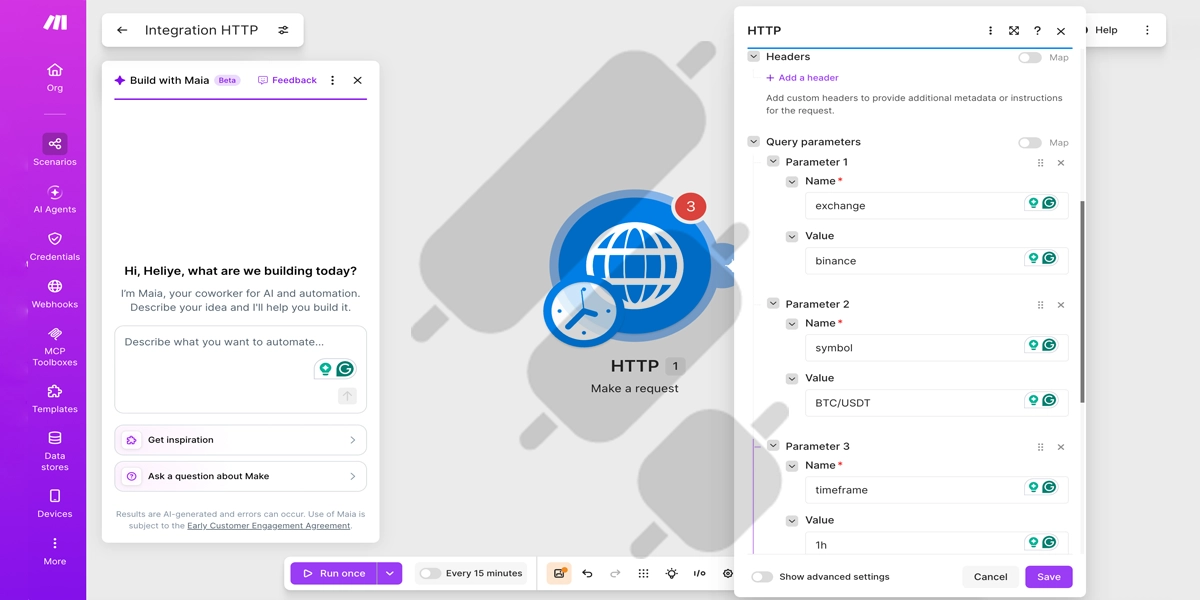
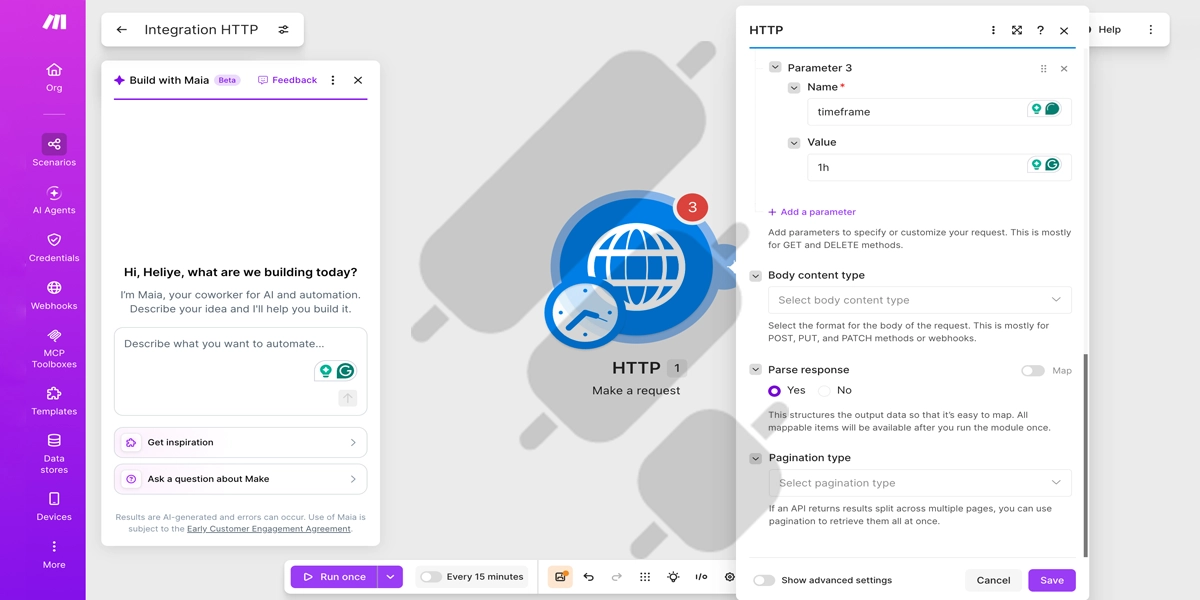
Now scroll down and set “Parse response” to “Yes”. Leave the rest of the fields, including Body, Headers, and Pagination, empty.
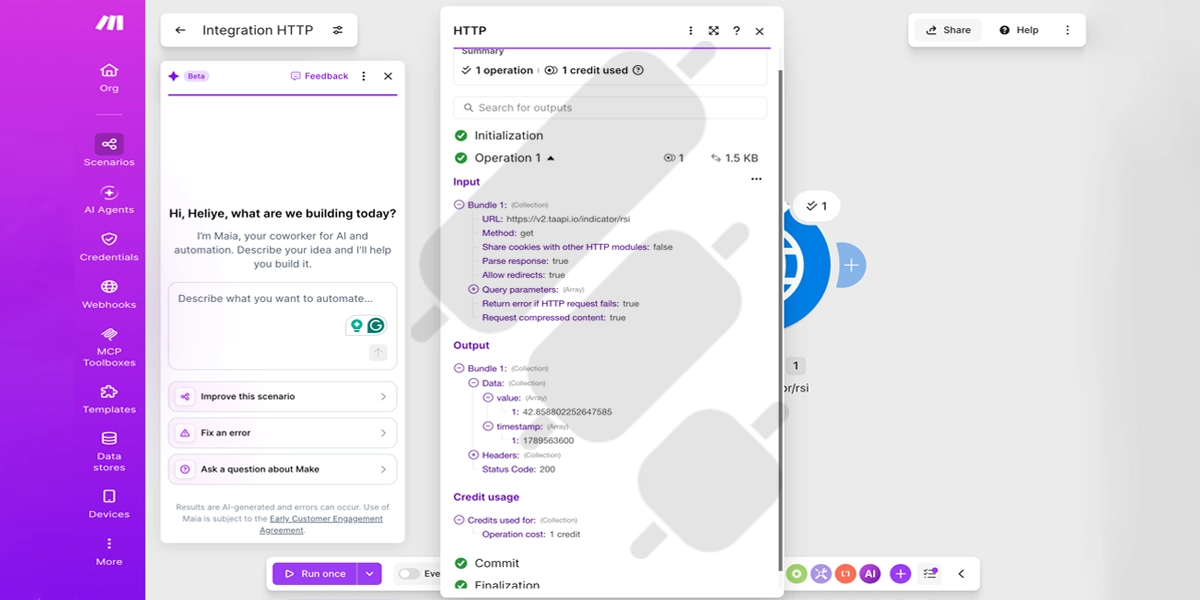
Now save and click Run once to test the connection. If everything is done correctly, you should get a 200 response. Click on “Data” to see the “value” and “timestamp”:
- The value array contains an RSI reading of approximately 42.86.
- The timestamp array identifies the corresponding BTC/USDT candle’s time.
Your RSI value may differ because the result depends on the market data available when you run the request.
4. Set a Signal Condition
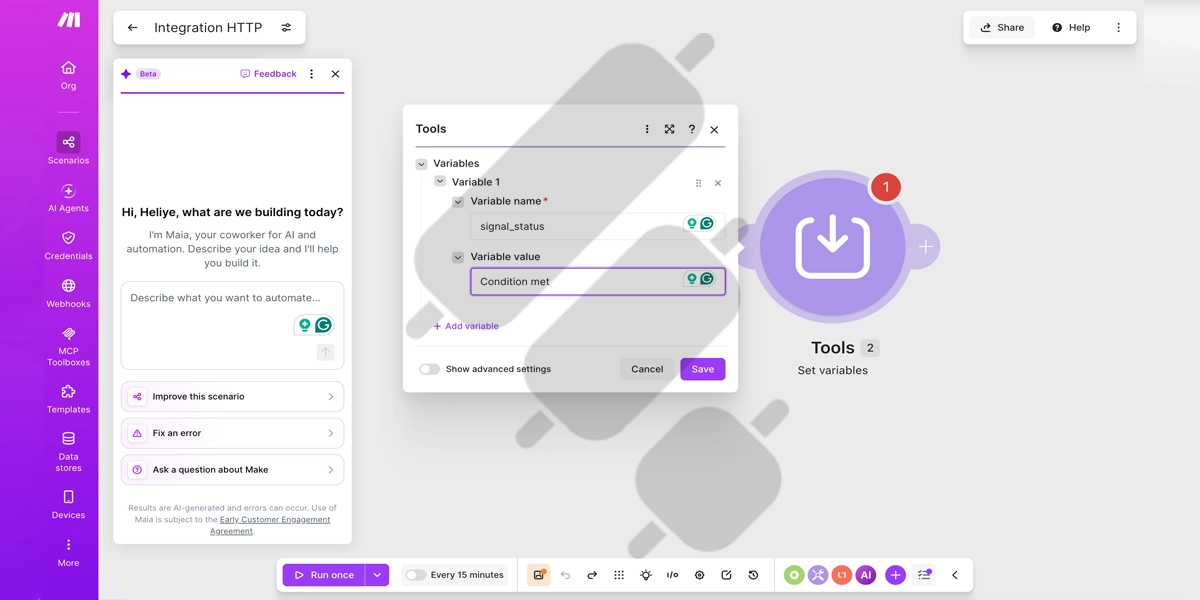
Now, we need to define a condition that determines whether MAKE proceeds to the next module. Close the window and click on the + icon on the right side of the HTTP module. Then, search for “Tools” and choose “Set variables”.
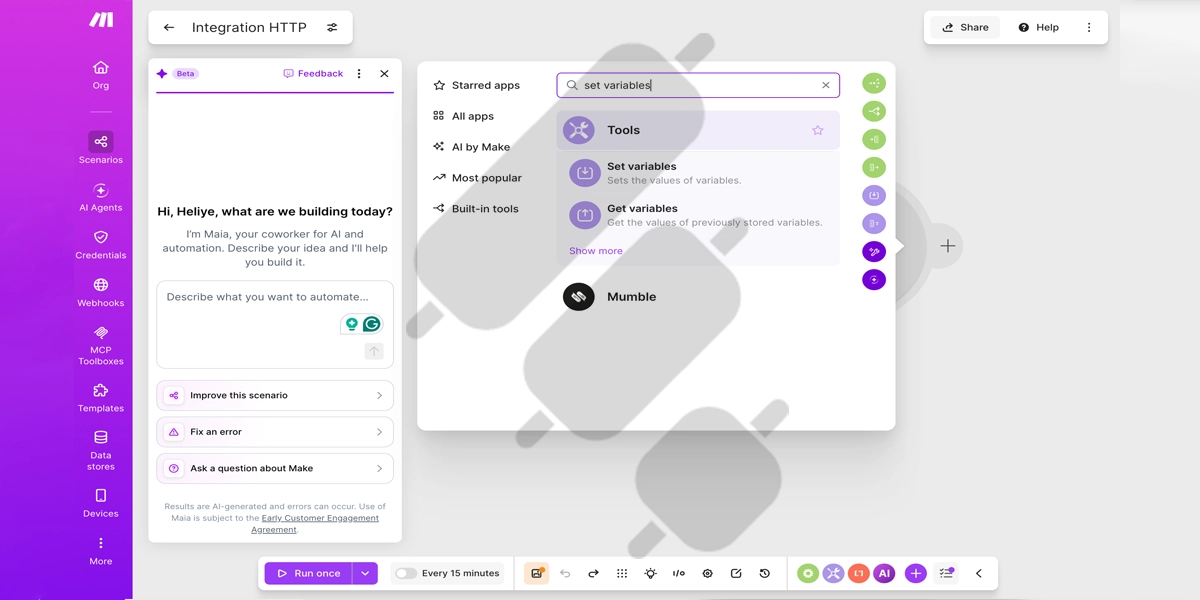
Define these:
- Variable: “signal_status”.
- Variable value: “Condition met”.
Then click Save. This module sets a variable in MAKE so we can confirm that the filter condition was met.
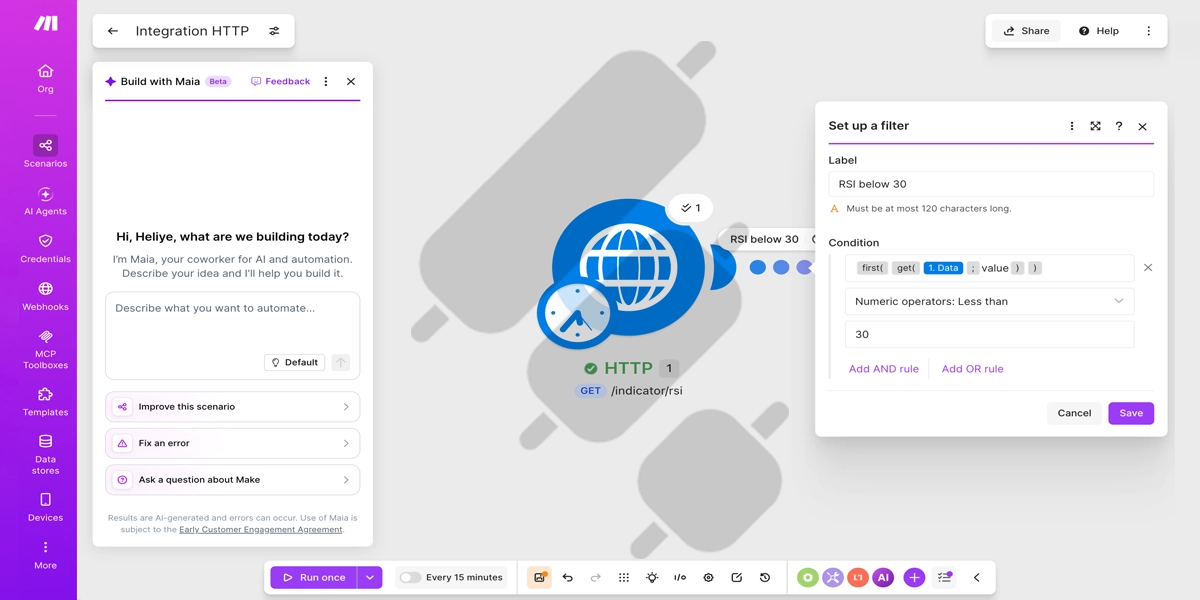
Now, click the line connecting HTTP to Tools to open the “Set up a filter” window. Suppose you want to send a signal when the RSI is below 30. To do this, configure the filter as follows:
- Label: “RSI below 30”.
- First field: “{{first(get(1.data; “value”))}}”.
- Second Field: “Numeric operators: Less than”.
- Third field: “30”.
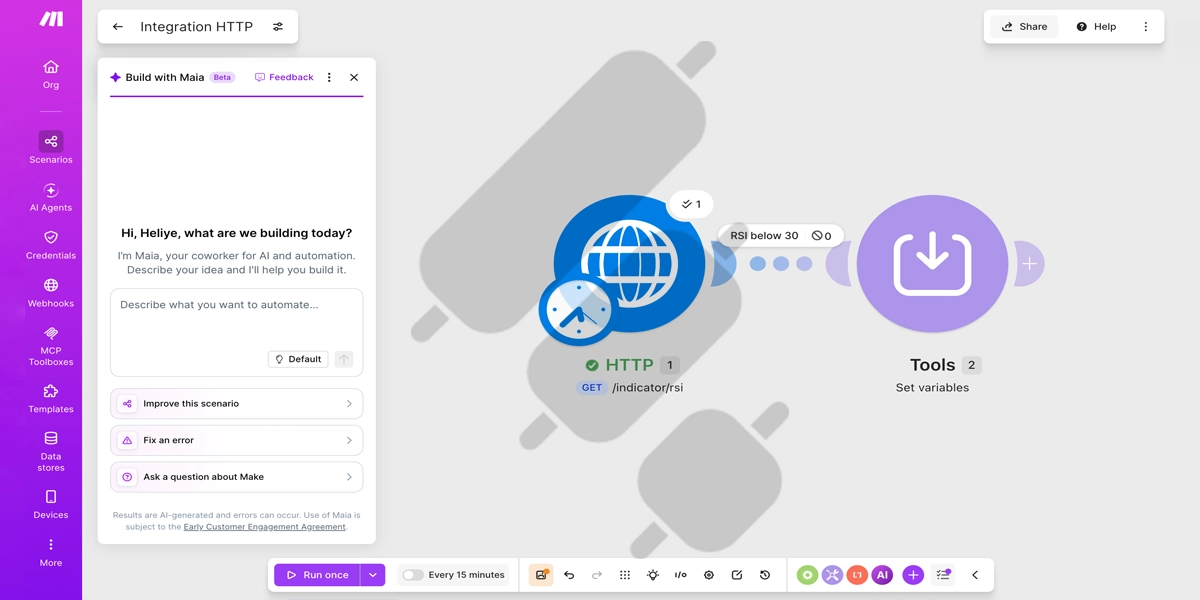
Then click “Save” and “Run once”. If the RSI is 30 or higher, the filter prevents the next module from running, as intended. In my example, the RSI was approximately 42, so the condition was not met and the Tools module did not run.
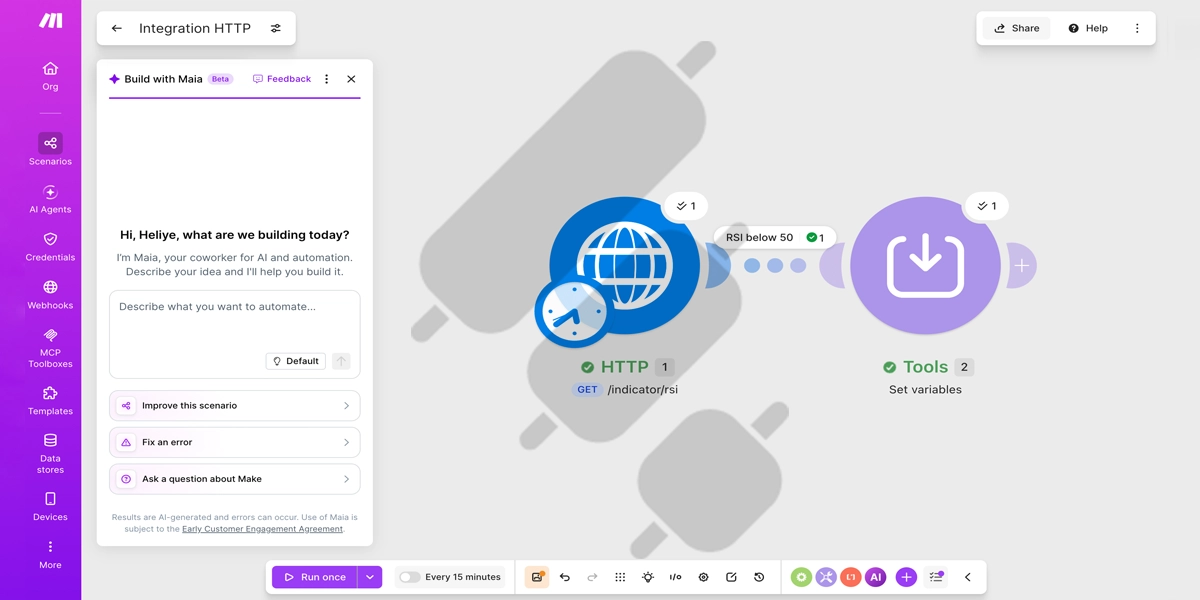
For testing purposes, let’s temporarily change the condition to RSI below 50, since the latest reading was approximately 42. This time, the Tools module showed a green check mark, confirming that the data passed through the filter and the variable was set successfully. No trading signal was sent at this stage.
5. Sign Up for Finestel and Add Your Exchange Account
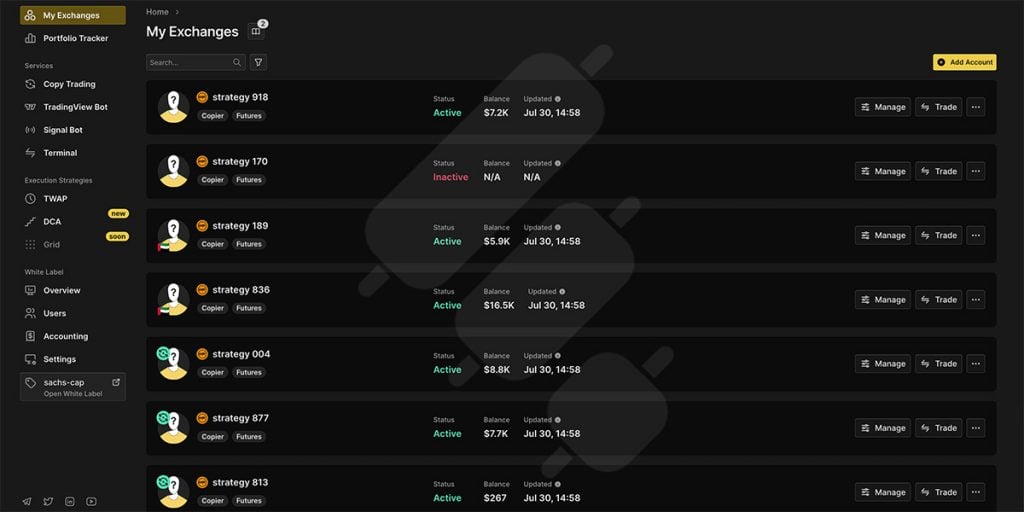
Go to Finestel.com and create an account. Then, go to “My Exchanges”, click “Add Account,” choose your exchange, and enter your exchange API keys.
6. Create a New Signal Bot With the Webhook URL and JSON Payload
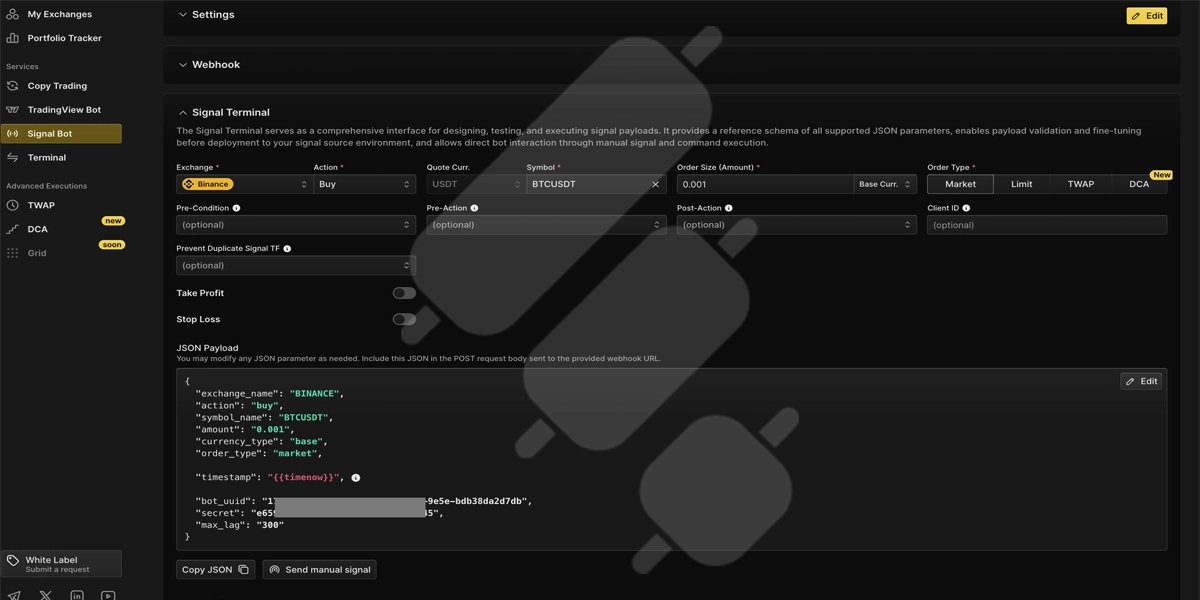
From the left sidebar in the Finestel dashboard, select “Signal Bot” and click “Create Bot.” Details such as the Webhook and JSON Payload are displayed on this page. After creating the bot, define parameters such as Name, Exchange Type, Order Type, TP, and SL.
In the “Signal Terminal” section, you also need to set parameters such as Exchange, Action, Symbol Pair, and Order Size. Once these parameters are configured, initiate the bot. The JSON payload is generated automatically.
7. Add Another HTTP Module in MAKE
Go back to the MAKE automation platform and click on the + icon next to the “Tools” module we created earlier, and choose “HTTP” and “Make a request”.
In the opened window, set these settings:
- Authentication type: “No authentication”.
- URL: Paste Finestel’s Webhook URL.
- Method: “POST”.
- Body content type: “application/json”.
- Body input method: “JSON string”.
- Body content: Paste the JSON payload generated by Finestel. Finestel requires the timestamp in ISO 8601 format and automatically fills it in only when you send a manual signal from its dashboard. In MAKE, you need to generate the timestamp yourself. Replace the timenow placeholder with the following expression:
“timestamp”: “{{formatDate(now; “YYYY-MM-DD[T]HH:mm:ss.SSS[Z]”; “UTC”)}}”. - Parse response: “Yes”.
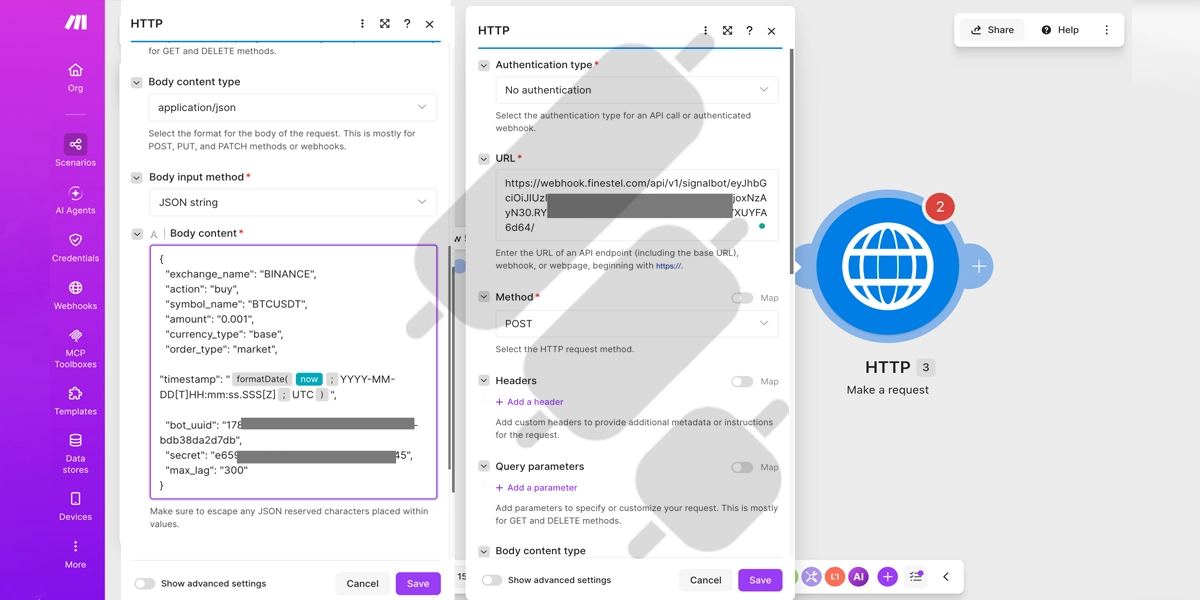
Now save and click “Run once” to see if the settings work. Same as before, when we run the “RSI below 30” condition, the Tools module would not run because the current RSI is approximately 42.
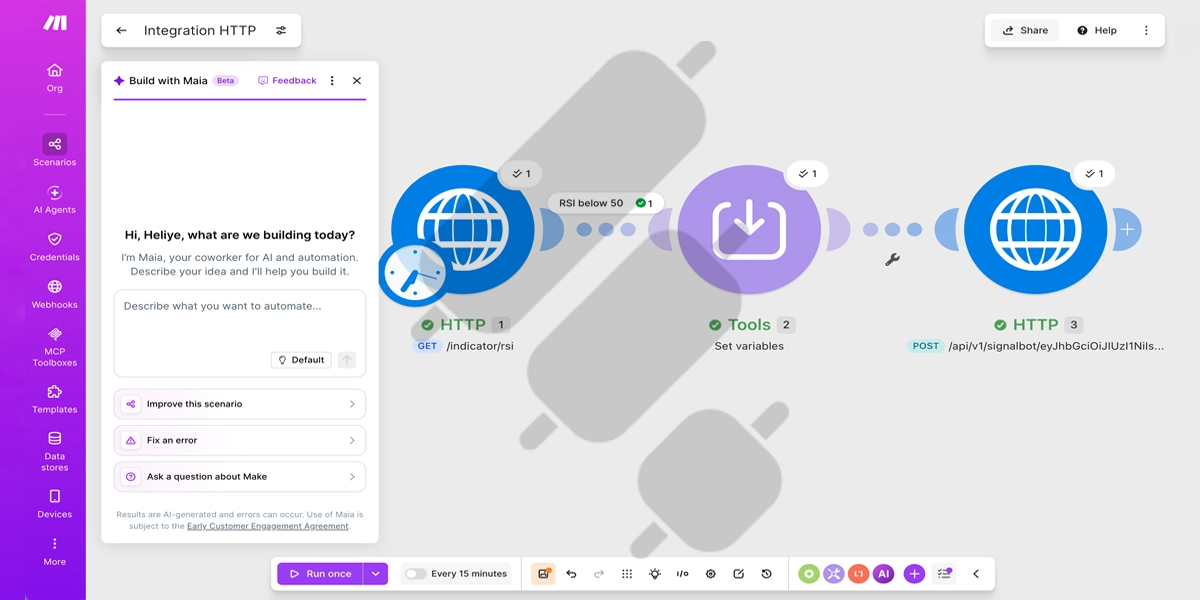
For testing purposes, I temporarily changed the condition to RSI below 50. As shown below, all three modules ran without reporting an error. This confirms that the workflow reached the HTTP module that sends the request to Finestel, but it does not confirm that a trade was executed.
8. Create a Data Store to Prevent Repeated Signals
Before enabling the schedule, we need to prevent repeated buy requests. In our example, if the RSI stays below 30 for an hour and the scenario runs every 15 minutes, it could send several requests. The current filter checks whether the RSI is below 30, not whether it has crossed from 30 or above to below 30.
MAKE needs to remember between runs whether another signal is allowed. We will use a Data Store to preserve this state; the Tools variable alone is not sufficient.
The intended logic is:
| RSI value | Expected result |
| RSI reaches 30 or higher | Enable signal sending. |
| On a later run, RSI falls below 30 | Send one signal and disable further signals after the request succeeds. |
| RSI remains below 30 | Do not send another signal. |
This detects transitions at scheduled checks, rather than every market movement between runs.
a. Create a Data Store
Click Data stores in the left sidebar and create a store named rsi_signal_state. Then click Create a data structure and name it rsi_state_structure.
Click + Add item and configure the field:
- Name: armed
- Type: “Boolean”
- Default value: “No”
- Strict: “No”
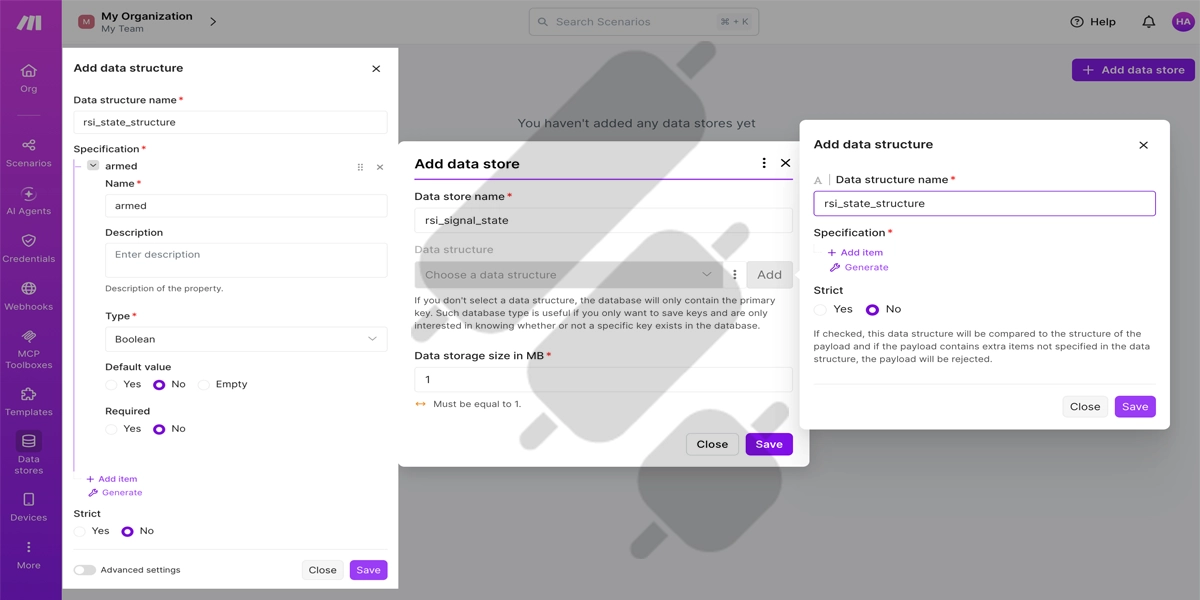
Click Save. In the previous window, keep Data storage size in MB at 1 and click Save again.
b. Check the Stored Data
Open the rsi_signal_state data store and click “+Add”. In the new row, enter the following values:
- Key: “binance_BTCUSDT_1h_rsi30”
- armed: “False (off)”.
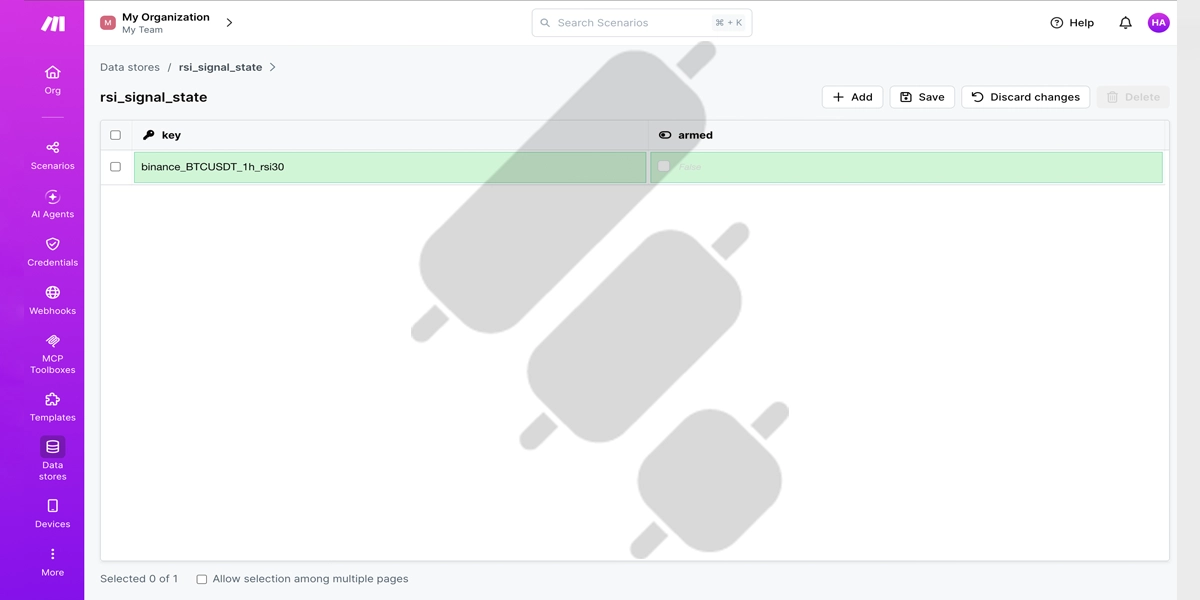
Save your changes and return to the “Scenarios” tab.
Remove the existing RSI filter from the connection between the first HTTP module and Tools. Readings of 30 or higher must also pass through so the scenario can enable signal sending again.
c. Add a Module to Read the Stored State
Open the scenario you created earlier, then:
- Right-click the line connecting the first HTTP module to Tools and select “Add a module”.
- Search for “Data store” and select “Get a record”.
- Configure the module:
- Data store: choose “rsi_signal_state”.
- Key: “binance_BTCUSDT_1h_rsi30”
Click Save. Keep scheduling off and do not run the scenario yet: the routing filters must be added before testing to prevent an unfiltered request from reaching Finestel.
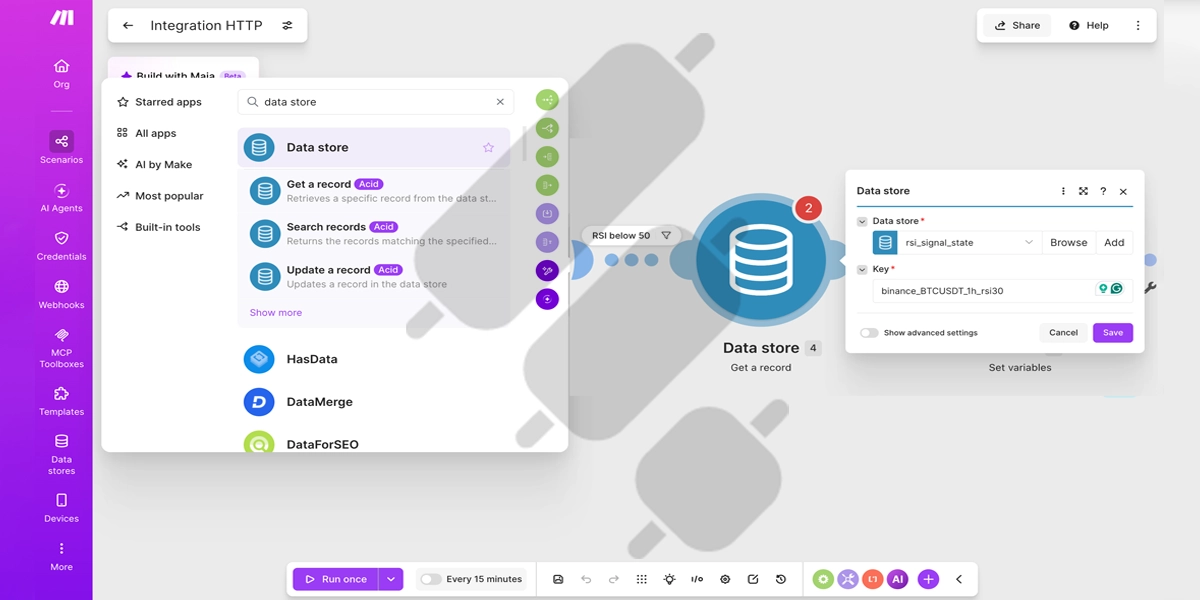
d. Remove the RSI Below 30 Filter
Remove the previous RSI filter by right-clicking the connection before this module and selecting “Remove Filter”. We need to read the stored state on every run, including when the RSI is above 30. In the next step, we will add conditions to the Router’s two branches.
Do not click “Run once” yet. With the filter removed, the scenario could send a request to Finestel without checking the trading conditions.
e. Add a Router with Two Paths: The First Branch
Add a Router between Data store and Tools. The Tools module can remain in place for now.
- Right-click the connection between Data store → Tools and select “Add a router”.
- Click the connection between Router → Tools to configure a filter:
- Label: “Send buy signal once”.
- First field: Add “{{first(get(1.data; “value”))}}” in the first field.
- Second Field: “Numeric operators: Less than”.
- Third field: “30”.
In the same filter, click “Add AND rule” and add the second condition:
- First field: Select the armed token from “Data store module 4”.
- Second field: “Boolean operators: Equal to”.
- Third field: Choose “General functions → Keywords → true”.
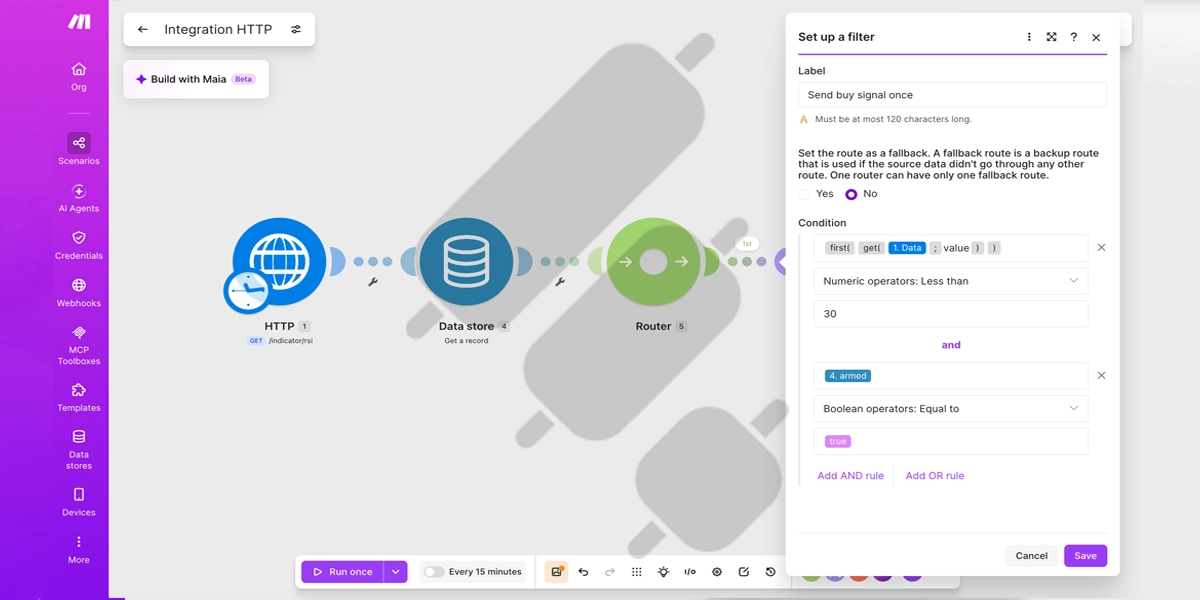
This route only runs when the RSI is below 30, and signal sending is enabled (armed = true).
f. Add Update Record for the 2nd HTTP
Next, add a module after **HTTP module 3** to disable further signals after the request succeeds:
- Click the + button to the right of HTTP module 3.
- Select “Data store” and “Update a record”.
- Configure the module as follows:
- Choose a Data store: “rsi_signal_state”.
- Key: “binance_BTCUSDT_1h_rsi30”.
- Insert missing record: “No”.
- Overwrite an existing array in the record: “No”.
- armed: “No / false”.
- Keep the map button next to armed off and choose “No”.
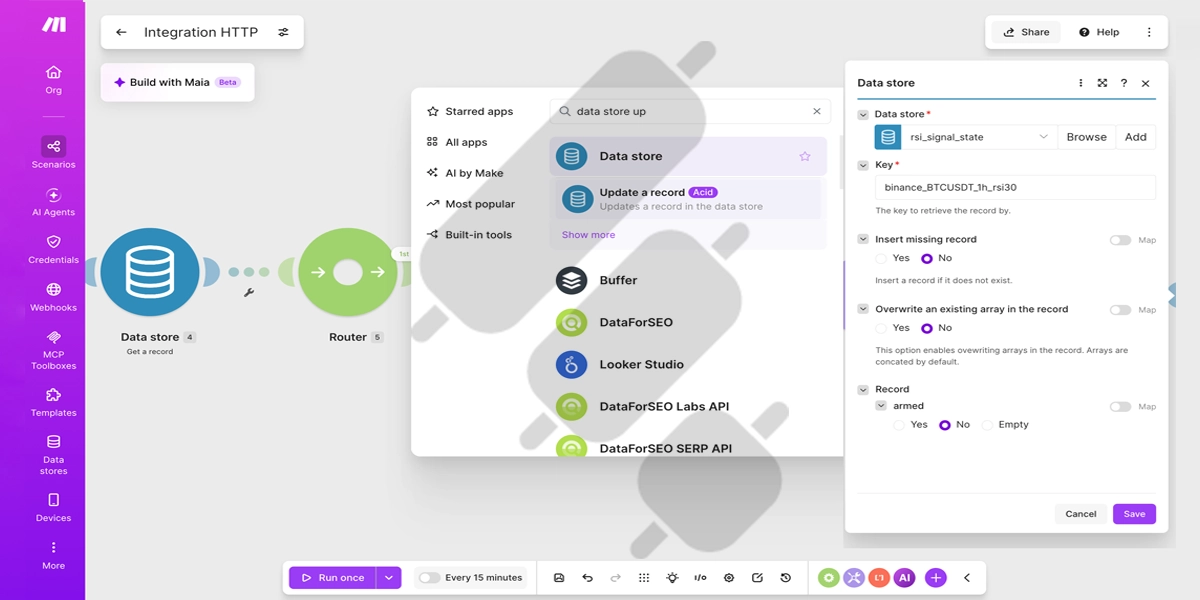
This module sets armed to false after the HTTP request to Finestel completes successfully.
g. Add a Router with Two Paths: The Second Branch
To create the second branch:
- Click the Router, then click the + button on the new branch.
- Select “Data store” and “Update a record”.
- Select the same data store and enter the same key as before, but this time set armed to “Yes”.
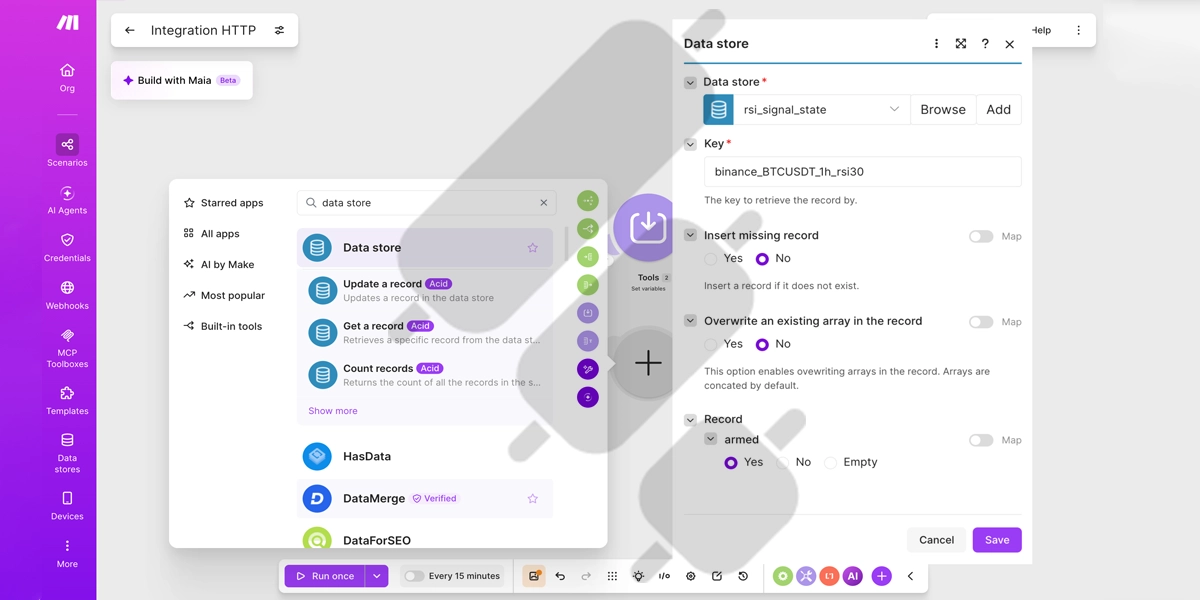
Now, click the connection between the Router and the new Data store module and configure the following filter:
- Label: “Rearm when RSI recovers”
- Fallback: “No”
- First field: “{{first(get(1.data; “value”))}}”
- Numeric operators: Greater than or equal to
- Third field: “30”.
Then, click “Add AND rule”:
- First field: Select the armed token from “Data store module 4”.
- Second field: “Boolean operators: Equal to”.
- Third field: Choose “General functions → Keywords → false”
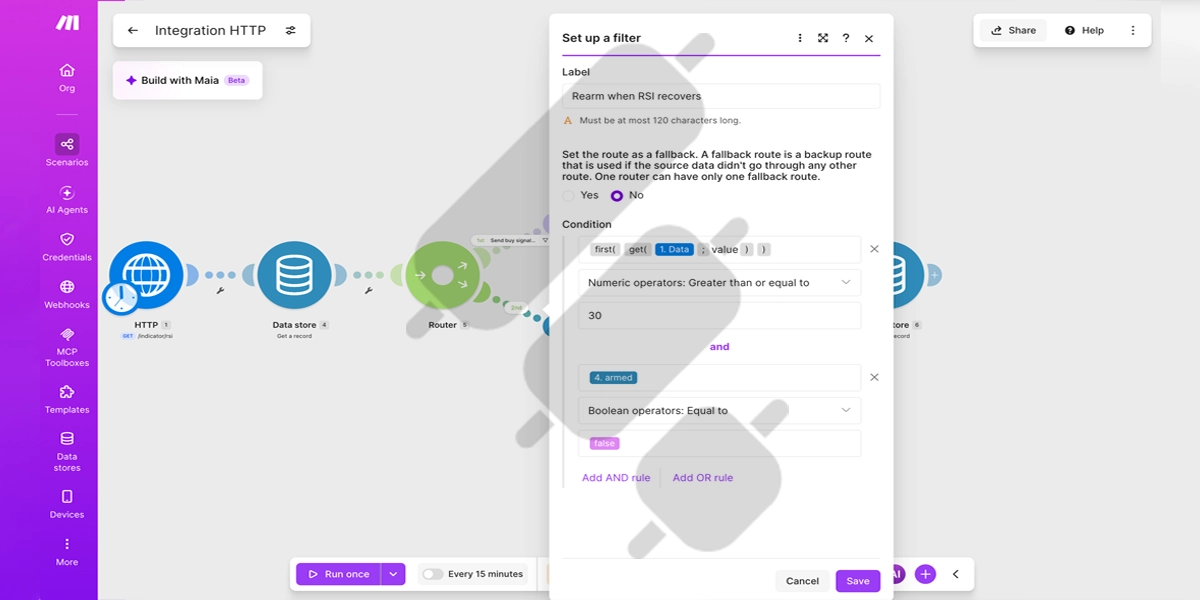
Then save.
9. Save the Scenario and Test the State
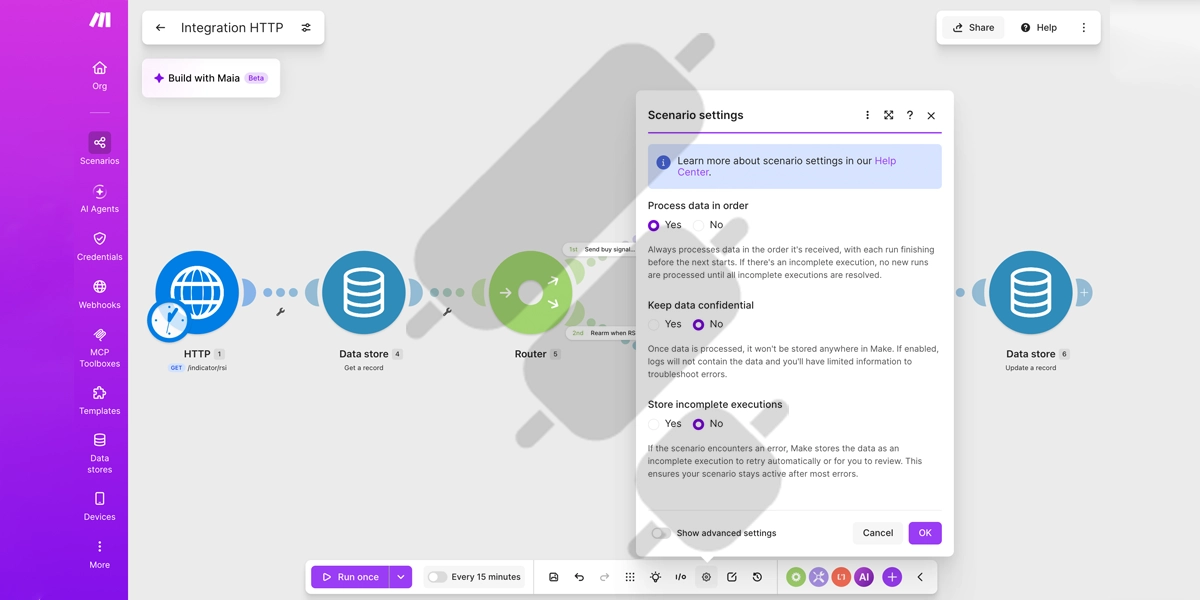
The scenario configuration is now complete and should look like this:
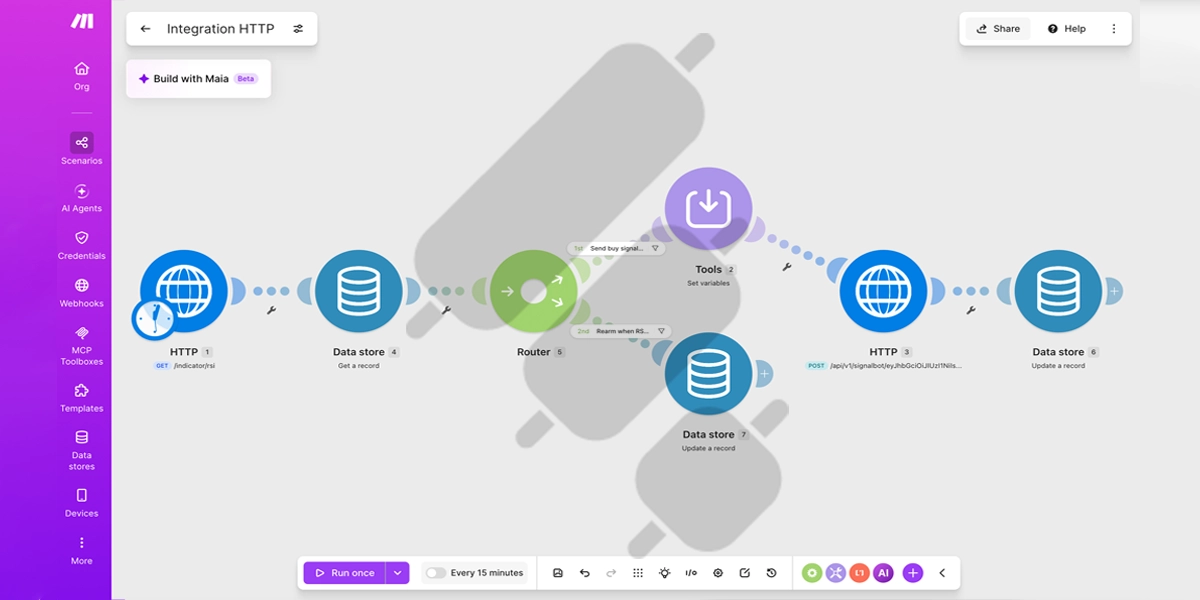
Click “Settings” in the bottom toolbar and set “Process data in order” to “Yes”, so that two runs cannot read the armed state at the same time. Save the scenario and keep scheduling turned off for now.
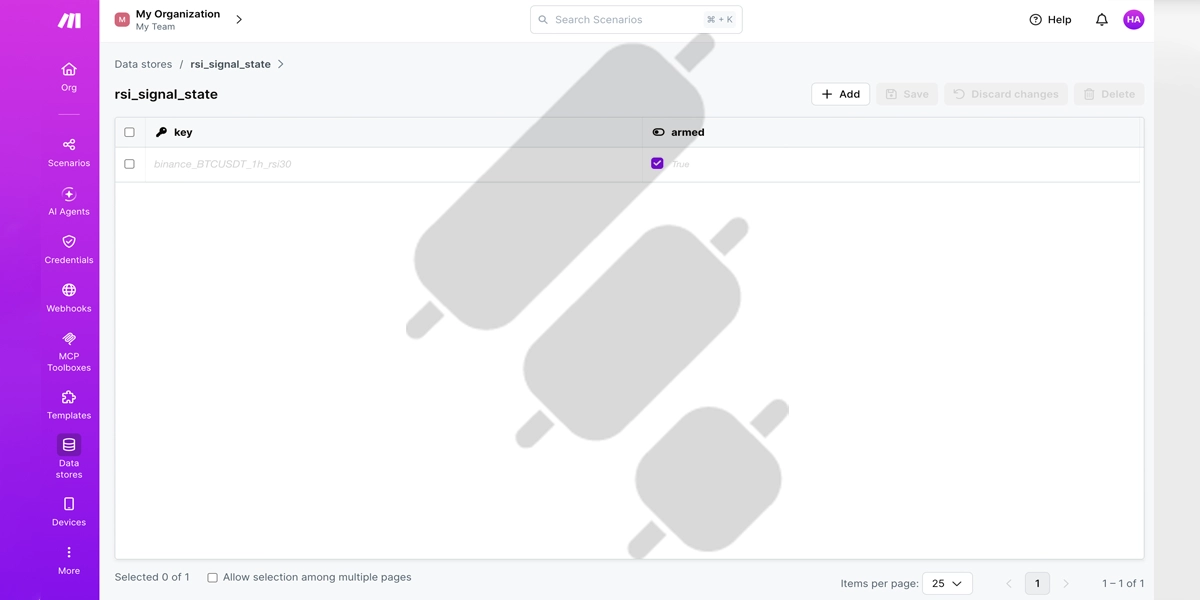
Next, test the rearming branch. Click Data stores in the left sidebar and open rsi_signal_state. Find the record with the key binance_BTCUSDT_1h_rsi30 and make sure armed is set to false (off). Save any changes.
Return to the scenario and click Run once. With the filters configured as described, the expected results are:
| Latest RSI | Expected result |
| 30 or higher | Only the lower branch runs, and module 7 sets armed to true. |
| Below 30 | Neither branch passes its filter, and armed remains false. |
During this initial run, with armed = false and the filters correctly configured, the HTTP module that sends requests to Finestel should not run.
In our test run, the rearming branch executed successfully. With our configured filters, this indicates that the RSI was at least 30 and “armed” changed from “false” to “true”. To confirm, open the record in “rsi_signal_state”; the “armed” toggle should now be on.
10. Activate the Scenario and Monitor Its Runs
ٔNow, click the schedule control next to Run once, choose your preferred interval, and turn scheduling on. MAKE will then check the RSI automatically at each scheduled run.
With the filters configured in this tutorial, the expected behavior is:
- When the RSI is 30 or higher and armed is false, MAKE sets armed to true.
- On a subsequent run, if the RSI is below 30 and armed is true, MAKE sends the configured buy signal to Finestel. If Finestel accepts the signal and the account meets the order requirements, it should submit the order to the connected exchange.
- After the HTTP request completes successfully, the final Data Store module sets armed to false, blocking further signals while the RSI remains below 30.
Check MAKE’s execution history for errors and verify signal acceptance and order status in Finestel. A successful HTTP response alone does not confirm that an order was filled.
Enabling the schedule, or clicking “Run once” when the buy conditions are met, can trigger a real trade.
Make Alternatives: Zapier, n8n, and IFTTT
Zapier, IFTTT, and n8n vs. MAKE automation platform comparison comes down to your automation needs:
- Zapier focuses on connecting business apps.
- n8n offers more technical control.
- IFTTT is useful for simple everyday automations.
| Platform | Key strength | Best suited for |
| Zapier | No-code workflows connecting business apps | Notifications, data syncing, and routine business tasks |
| n8n | Customizable workflows with self-hosting options | Technical users building custom API and signal-processing workflows |
| IFTTT | Simple trigger-based Applets | Basic alerts, personal tasks, and smart-home automation |
MAKE vs. Zapier Bot
Zapier is also a powerful automation platform. For the crypto workflow described here, I recommend Zapier if you need straightforward integrations without a visual style. Make’s visual canvas is useful for following the branching logic and stored data state in my RSI example.
Read more about Zapier crypto trading automation in our blog.
MAKE vs. n8n Trading
Make suits users who want to build visual workflows in a managed cloud environment. n8n combines visual workflows with custom code and offers both cloud hosting and self-hosting.
For this crypto setup, n8n is a better fit if you need control over where your workflow runs or want to add custom signal-processing logic. However, to use n8n, you need to self-host it, which means managing your own server, updates, and security.
For a closer look at its features and how it handles crypto trading workflows, read our n8n trading bot article.
MAKE vs. IFTTT Automation
For the RSI workflow I explained in this tutorial, Make is a better fit because its visual routers and data stores let you organize conditional paths and remember whether a signal has already been sent.
However, if all you need is a simple trigger-based task, such as sending a notification when an alert arrives, IFTTT is enough. Its Applets also support multiple actions and custom filter code.
Read our IFTTT review for a look at how to set it up for crypto trading.
Final Thoughts
After building this workflow, I see Make as a useful option for traders who want control over how market data becomes a trading signal. Its visual editor made the logic easy to follow, and the HTTP module provided a working alternative when the TAAPI.IO integration failed in my test. However, getting authentication, payloads, and state management right required more technical work than “no-code” might suggest.
I would choose Make for a custom signal workflow that I can test and monitor. It makes automation more accessible, but the trading rules, error handling, and verification of orders still need careful attention.
FAQs
Do I need an AI agent to automate trading with Make?
No. This workflow uses API requests, filters, and stored state. Its decisions follow predefined conditions, so you don’t need an AI agent.
Can I adapt this workflow for multiple trading pairs?
Yes, but each pair needs matching market-data requests and order payloads. Use a separate Data Store key for each pair and strategy so one pair’s signal doesn’t disable another’s.
Does selecting a one-hour timeframe mean the scenario runs once per hour?
No. The timeframe determines the candles used to calculate the indicator. MAKE’s schedule determines how often it requests that value. A scenario running every 15 minutes can still request RSI based on one-hour candles.




Leave a Reply