


Zapier crypto automation connects the apps you already use to a crypto trading bot, so a signal in one tool can become a real order on your exchange with no manual clicks. It is built on the simple idea that when an event happens in one app, an action runs in another.
Zapier is not a trading bot; it is a messenger. To actually place and manage orders, you need a dedicated execution tool like Finestel’s signal bot, which receives the signal through a webhook and trades on your connected exchange. Based on my testing, Zapier is a good fit when a signal needs to pass through a few checks or extra steps before it reaches the bot.
What Is Zapier and How Does It Work?
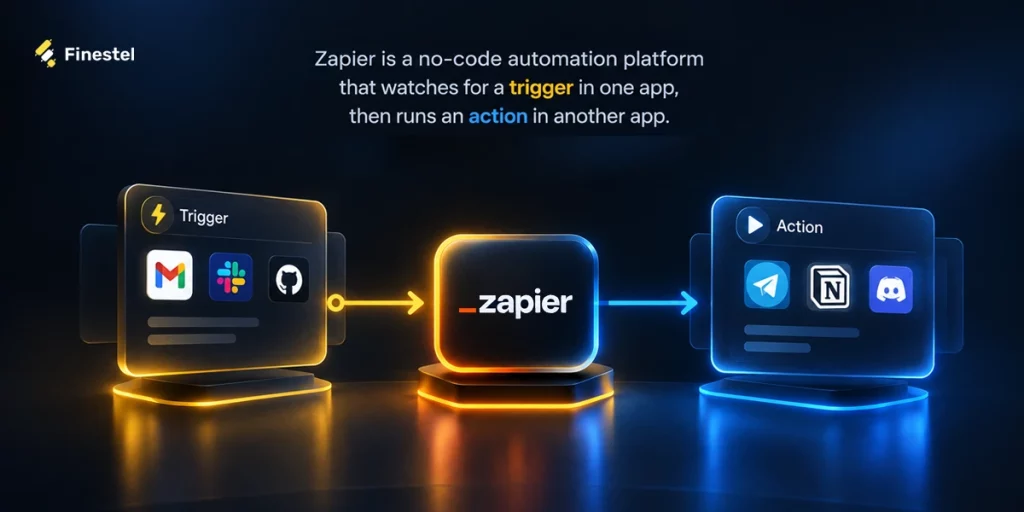
Zapier is a no-code automation platform that watches for a trigger in one app, then runs an action in another app. For crypto, this means catching a signal from a source like TradingView, ChatGPT, an RSS news feed, or a supported message received by your Telegram bot, and passing it to a bot that places the trade.
Zapier connects more than 8,000 apps so they can share information automatically, without writing any code. Each automation you build is called a “Zap”. A Zap has two main parts:
- Trigger: the event that starts the workflow. For example, a new alert arriving from TradingView or a new message being posted in a Telegram channel.
- Action: what happens next. For example, “send a web request to a trading bot.”
A simple Zap is one trigger plus one action. But Zapier’s real strength is multi-step workflows. Between the trigger and the final action, you can add steps that filter, reformat, or check the data.
Read more about the best crypto trading bots in our blog.
How Can Zapier Be Used for Crypto Trading Automation?
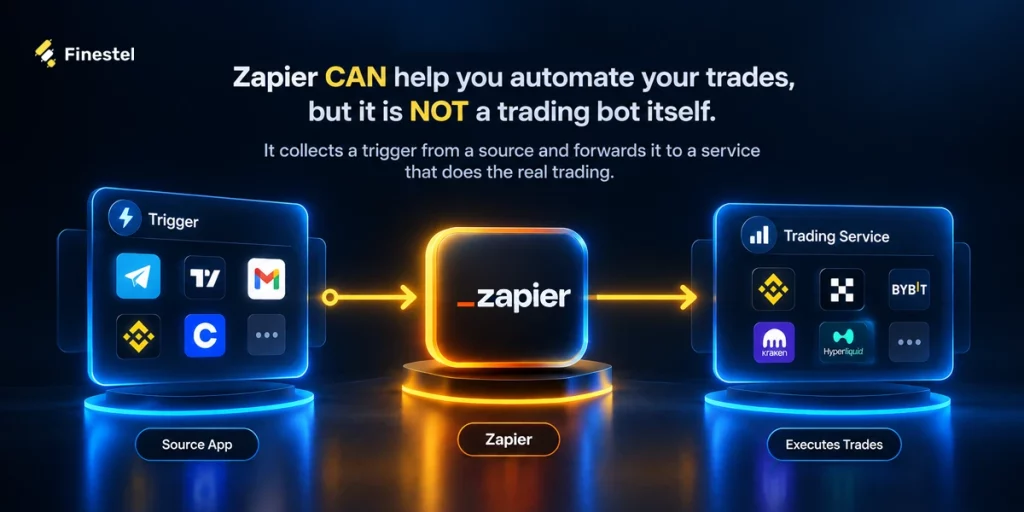
You may see the phrase “Zapier trading bot,” but it is inaccurate. Zapier can help you automate your trades, but it is not a trading bot itself. It collects a trigger from a source and forwards it to a service that does the real trading.
Zapier has published a ready-made crypto template that shows this exact idea. It catches incoming market payloads through a webhook, uses ChatGPT to classify each signal as Long, Short, or Neutral, branches on that decision with Paths, and then posts a buy or sell instruction to an execution endpoint while logging the result.
Common signal sources you can turn into a Zapier crypto workflow include:
- TradingView alerts: send a strategy or indicator alert into Zapier.
- ChatGPT (OpenAI): read a headline or message and return a simple buy/sell label.
- RSS news feeds: trigger when a keyword appears in a news source.
- Telegram: with the Zapier Telegram integration, the “New Message” trigger can start a workflow when your bot receives a message in a private chat or a group (the bot must be added to the chat and Privacy Mode disabled in BotFather).

Pros and Cons of Using Zapier for Crypto Trade Automation
Before building anything with Zapier crypto automation, it helps to know where Zapier is strong and what drawbacks it has.
Advantages of connecting Zapier to a trading bot:
- No coding needed, with a beginner-friendly visual editor.
- Connects to thousands of apps and AI tools.
- Handles multi-step logic well, so you can add filters, paths, or a ChatGPT check before a trade.
- Delivers webhooks to a trading bot reliably.
- Easy to add checks or notifications before a trade fires.
Limitations of using Zapier for crypto trading:
- Webhooks and multi-step Zaps require a paid plan.
- The free plan does not support webhooks, so live trading needs a paid plan (a 14-day pro trial is available to test first, with webhooks available).
- Task-based pricing can get expensive as your signal volume grows.
- Not built for fast, high-frequency trading.
Zapier Pricing Plans and Free Account Limits
Zapier’s pricing is task-based. Successful billable actions count toward your task usage, while triggers, Filters, and Paths do not. For example, a workflow with three actions that each consume one task per run uses 300 tasks after 100 successful runs.
This matters a lot for crypto, because an active signal source can trigger many runs. Prices change often, so always confirm the latest numbers on Zapier’s pricing page before you buy.
Here is how the plans compare in 2026:
| Plan | Price | Tasks/ Month | Key Features |
| Free | $0 | 100 | Two-step Zaps only, no webhooks. |
| Professional | From $19.99/mo (annual) or $29.99/mo (monthly) | 750 | Multi-step Zaps, webhooks, filters, paths |
| Team | From $69/mo (annual) or $103.50/mo (monthly) | 2,000 | Everything in the Professional plan, plus shared workspace and multiple users |
| Enterprise | Custom | Custom | Advanced security, unlimited users, service-level agreements (SLAs) |
When you create a new Zapier account, you get a 14-day free trial, with webhooks and multi-step Zaps unlocked. This is enough to build and test your setup.
Once the trial ends, you will need the Professional or higher plan to keep live trading running, because the free plan does not include webhooks.
How to Automate Crypto Trades With Zapier and Finestel Bots
Finestel’s signal bot is built to receive signals through webhooks. Each bot has its own webhook URL, and any tool that can send a POST request can trigger it. That makes Zapier compatible with this workflow: you build a Zap that ends in a “Webhooks by Zapier” POST action and paste the Finestel webhook URL into it. For this reason, I have used the Signal bot in this tutorial. Let’s go through the full setup.
Step 1: Add Your Exchange Account to Finestel
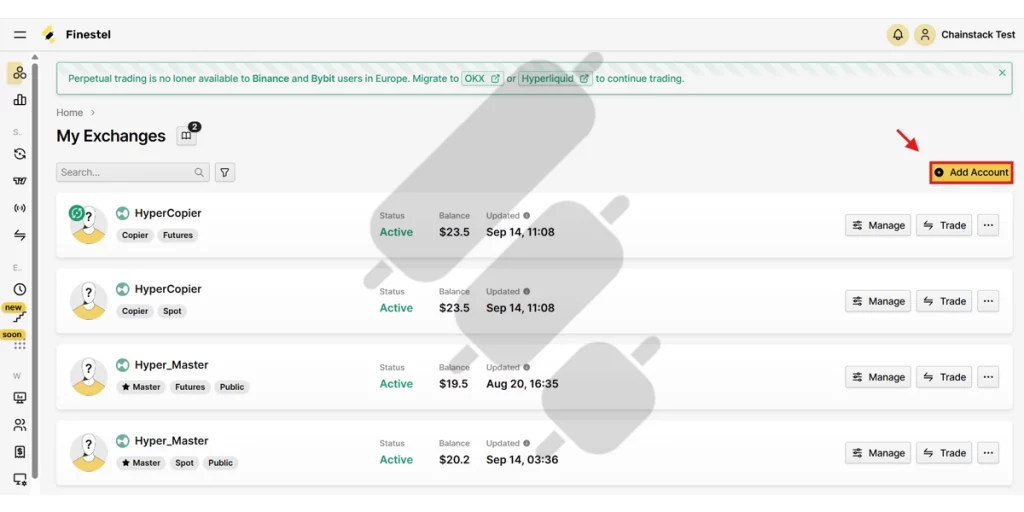
Log in to your Finestel account. Go to “My Exchanges”, click “Add Account”, choose your exchange, and enter your API keys.
Step 2: Create a Signal Bot and Copy the Webhook URL
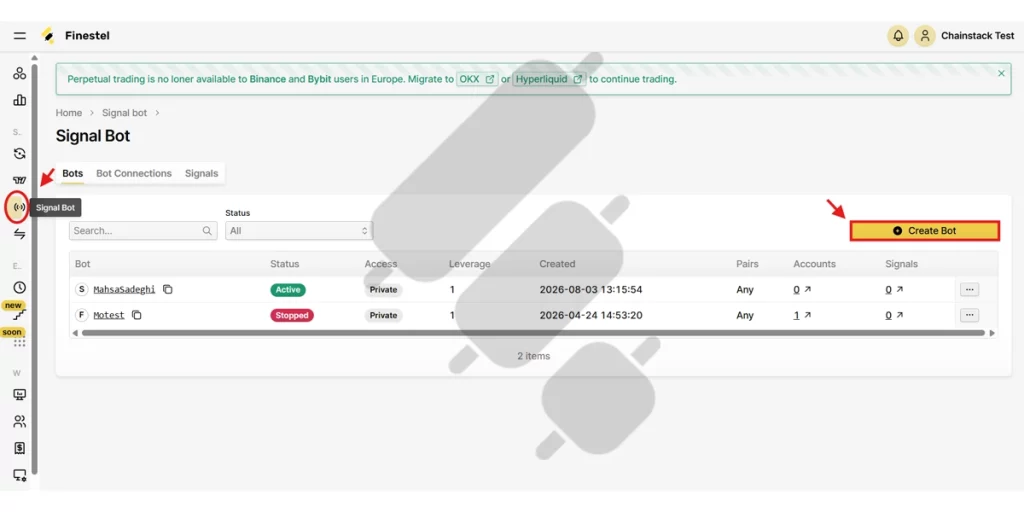
From the left menu in the Finestel dashboard, open Signal Bot and click “Create Bot”.
On this page, you will see the Webhook URL and the JSON Payload. Set your bot details, such as Name, Exchange Type, Order Type, TP, and SL. In the Signal Terminal section, set the Exchange, Symbol Pair, and Order Size.
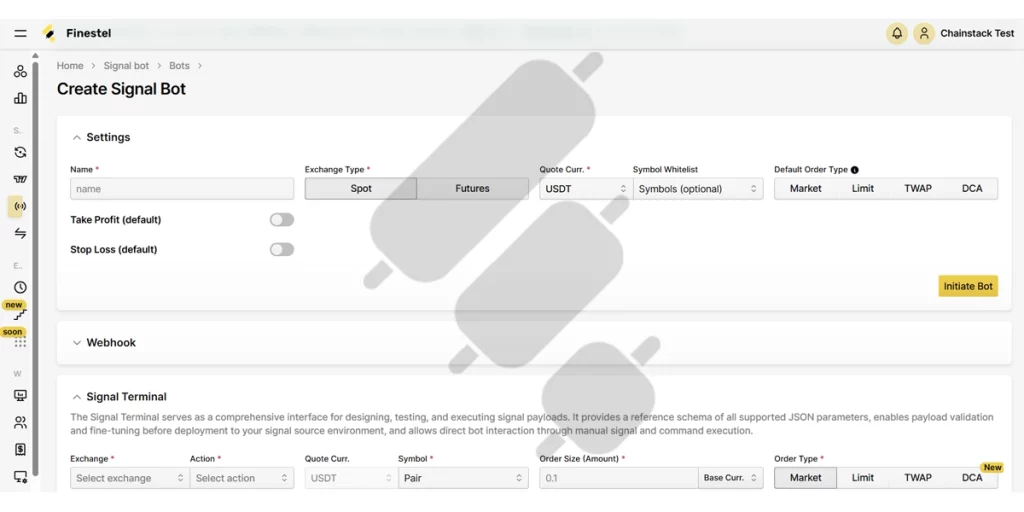
Once these are filled in, Finestel builds the JSON Payload for you automatically. Copy the Webhook URL and the JSON Payload, and make sure the bot is switched on.
Step 3: Create a New Zap and Choose Your Trigger
If you do not have an account yet, go to zapier.com and click “Sign up”. Once you are logged in, click “Create” to start a new Zap. For what I am building in this article, I chose the first option: “Zaps” (Automated Workflows).
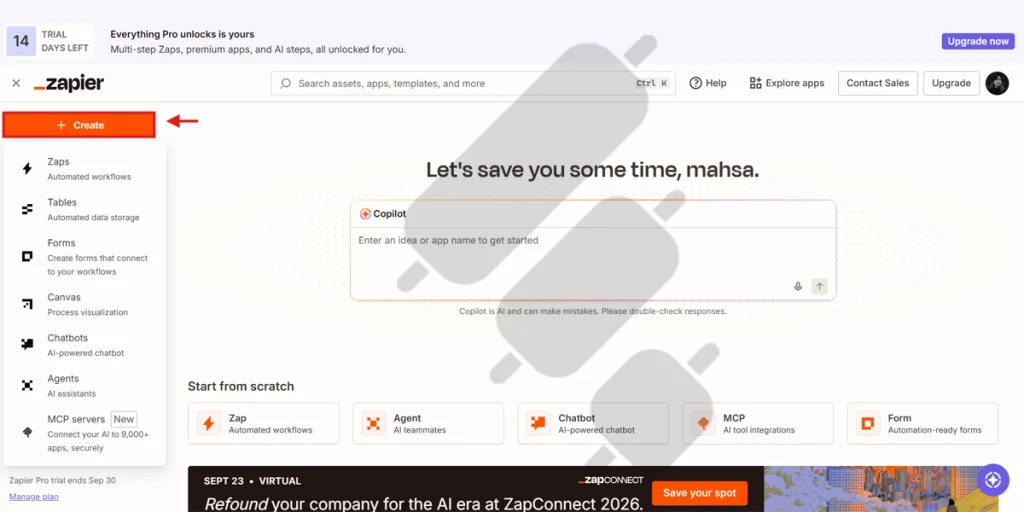
As you can see, the Zap editor opens with a Copilot box at the top and, below it, two blocks: a Trigger and an Action. You can ignore Copilot and build the Zap manually.
Click the Trigger block first to pick the app that will act as your signal source:
- To catch signals from TradingView or any tool that can send a POST request, search for webhooks and choose “Webhooks by Zapier”. This gives you a Zapier URL to paste into your signal source.
- To use news, search for RSS and choose the “RSS by Zapier” trigger, then enter your feed and keyword.
- To trigger from Telegram, connect the Telegram integration and use the “New Message” trigger. It fires on messages your bot receives in a private chat or group, so the bot must be in that chat with “Privacy Mode” disabled.
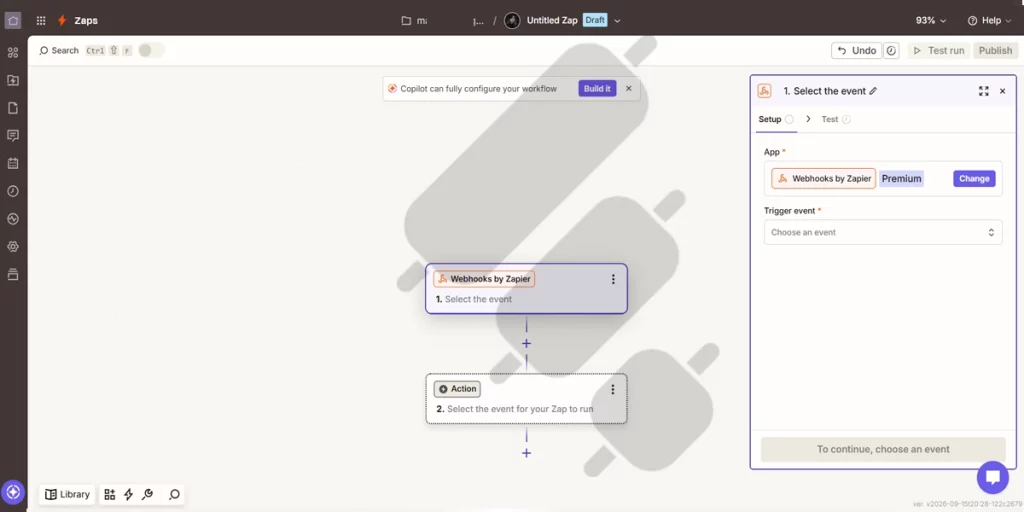
Step 4 (Optional): Add Checks Before the Trade
Before sending the signal out, you can add steps like:
- A filter so the workflow only continues for the right symbol or direction.
- A ChatGPT step that reads a headline and returns “Long,” “Short,” or “Neutral.”
- Paths that route different assets or strategies to different bots.
Step 5: Add the Webhooks by Zapier Action
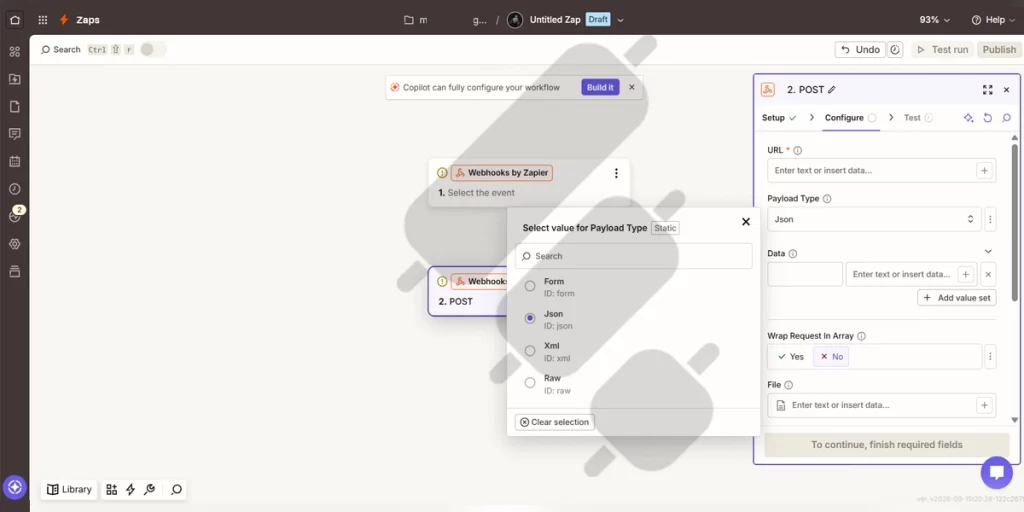
Add a final action step, search for Webhooks by Zapier, and choose POST.
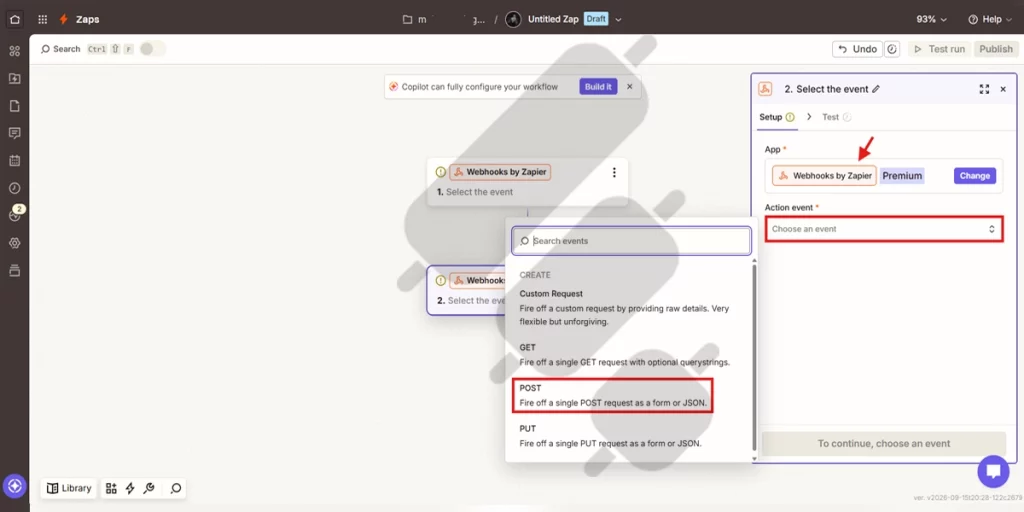
Then fill in these fields:
- URL: Paste the Webhook URL you copied from your Finestel signal bot.
- Payload Type: Choose JSON.
- Data: Paste the JSON Payload from Finestel, mapping in values from earlier steps if needed.
Finestel handles authentication with the Bot ID and Secret Key inside the URL or payload, so you do not need to add extra headers.
Step 6: Test, Turn On, and Monitor
Run a test to confirm the request reaches Finestel and the bot responds. If everything looks right, turn the Zap on. Keep an eye on the Zap history and your Finestel dashboard for the first live signals.
TradingView to Finestel: Direct or Through Zapier?
One thing worth knowing: if your only signal source is TradingView, you do not need Zapier at all. Finestel has a dedicated TradingView bot that connects TradingView alerts straight to the bot. Adding Zapier in the middle only makes sense when you want to do something extra first, like check the signal with ChatGPT or send a Telegram notification before the trade.

Zapier Alternatives for Crypto Automation
Zapier crypto automation is not the only option. If it does not fit your budget or needs, here are the main alternatives, each of which can also send signals to Finestel.
| Tool | Best for | Notes |
| IFTTT | Simple, single-step automations | Easiest to learn, but limited for multi-step logic. See our IFTTT crypto trading bot guide. |
| Make | Visual, multi-step workflows | Strong visual builder and good free plan (1,000 credits); takes time to learn. |
| n8n | Full control and self-hosting | Free when self-hosted; supports custom code. See our n8n trading bot guide. |
Risk Management When Using Zapier for Crypto Trading
Automation removes manual clicks, but it does not remove risk. Keep these points in mind before you go live.
- Keep your webhook URL and credentials private. Protect your Finestel webhook URL, the Bot ID, and the Secret Key included in your JSON payload. Never share them publicly, and hide them in screenshots. Exposed credentials could allow someone to send unauthorized trading instructions to your bot.
- Restrict your exchange API keys. Whatever tool you use, you can enable only Trade and Read permissions. That is enough for what you are doing.
- Block duplicate signals. Finestel’s signal bot has built-in protection here: it ignores repeated signals for the same symbol and order type within a time window you set, and it can reject a repeated Client ID or any signal older than your Max Lag setting.
- Start small. Test with the smallest position size first. Confirm the full path works end to end before you trade real size.
- Watch your task usage. Because Zapier bills per task, a noisy signal source can burn through your quota fast. Use Filters early in the Zap to stop unwanted runs.
Final Thoughts
Zapier is useful when your trading workflow needs extra steps between receiving a signal and sending it to Finestel. You can filter out signals that do not meet your rules, route them to different bots, or add notifications. If you only need to send TradingView alerts to Finestel, the direct connection is simpler. Add Zapier when those extra steps serve a clear purpose, and test the full workflow before relying on it for live trading.
FAQs
Do I need to code to connect Zapier to Finestel?
No. You build a Zap in Zapier’s visual editor and paste your Finestel webhook URL into a “Webhooks by Zapier” POST action. No coding is required.
Can I use Zapier’s free plan for crypto trading?
The free plan does not include webhooks, so you need at least the Professional plan to send signals to a trading bot. But when you first sign up, you receive a 14-day free trial that allows you to use webhooks.
Is Zapier fast enough for automated crypto trading?
It depends on how much delay your strategy can tolerate. Zapier can work for workflows that do not require immediate execution, but processing times vary, and delays can increase during busy periods. It is not designed for high-frequency trading. Test the full workflow’s execution time before using it for live trades. Suitability depends on the strategy’s tolerance for delays.
What happens if a Zapier webhook fails?
If the request fails, the signal may not reach your bot. Check the Zap’s run history, confirm the webhook URL and JSON payload are correct, and make sure your signal bot is active.
Can I pause a Zapier automation without deleting it?
Yes. You can turn a Zap off and back on at any time without rebuilding it.




Leave a Reply